There’s a strong chance you’ve installed or spotted copper pipe somewhere in a home or building. Copper is the metal of choice for potable water systems for a variety of reasons – the most important being that it is non-toxic and safe for drinking. The naturally occurring metal element is also preferred for various application Read more
soldering
There’s a strong chance you’ve installed or spotted copper pipe somewhere in a home or building. Copper is the metal of choice for potable water systems for a variety of reasons – the most important being that it is non-toxic and safe for drinking. The naturally occurring metal element is also preferred for various application types due to its high conductivity of electricity and heat, corrosion/fire resistance and durability.
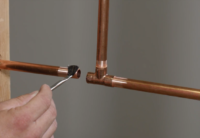
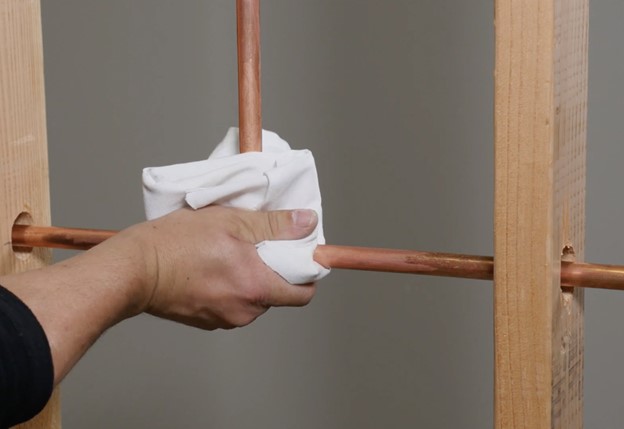
The process of joining copper pipe and fitting is called soldering (or sweating), which is a critical step in the copper installation process. Solder is a metal or metallic alloy that historically consisted of lead (known as lead-based solder) and tin in various proportions. Today, due to the Safe Water Drinking Act and lead-free restrictions, solders that contain more than 0.2% lead are not permitted for use in potable water systems.
Solders that are safe to use on potable water systems contain a percentage of tin and a combination of other non-toxic metals. The melting point of solder is lower than copper, and when heated, solder melts and fuses the piping together once completely cooled.
Learning how to solder copper pipe can seem daunting at first, but by applying proper techniques and avoiding typical errors, it becomes much easier to execute a leak-free pipe joint.
Let’s explore five common mistakes to avoid during the soldering process.
Choosing the Wrong Products
In addition to choosing the proper type of solder for your application, you will need to select the right type of copper pipe and flux, a compound that promotes the flow of molten solder between the pipe and fitting through a process known as capillary action.
Flux is also formulated to remove any oxidation from pipe and actually etches pipe surface in preparation for the soldering process to be successful. Important variables, such as ambient temperature, local code guidelines, and any jobsite time limitations, should all be considered prior to purchasing your soldering supplies.
Below, we’ve included some brief guidelines to keep in mind for your next soldering project.
- Copper Pipe
- Type K: Has the thickest wall and strongest durability. It is commonly used for commercial plumbing, such as underground water mains for potable water supply and HVAC lines.
- Type L: Wall thickness falls between Type K and M. Typically used for interior hot and cold-water distribution.
- Type M: Has the thinnest wall and is the most popular choice for domestic plumbing systems due to its light weight, decreased rigidity and affordability.
- Copper DWV: Commonly used in older homes for vents and drains. No longer a popular choice among modern-day homeowners, as there are more cost-effective options available.
- Flux
- Petroleum-based Flux (or Petrolatum Flux): Flushing required and designed to provide superior wetting properties for better solder flow. Compatible with all common plumbing solder alloys, such as copper, copper-coated metals, brass, zinc, galvanized iron, lead and tin.
- Hot Weather Flux: Specially formulated for hot weather climates and will not separate in temperatures up to 135°F.
- Water-soluble Flux: Water flushable and compatible with all common plumbing solder alloys.
- Tinning Flux: Available in both water-soluble and petroleum-based formulas. Enhanced with tinning powder particles to pre-tin piping and improve the flow of solder/enable even heating of a fitting, which is necessary when soldering larger diameter piping systems. Compatible with all common plumbing solder alloys. Check out this article to learn how to expertly solder low-lead brass using tinning flux.
Although petroleum-based fluxes are safe to use, they are required to be flushed with a chemical solution from the piping system due to their water insolubility. However, water-soluble fluxes become self-cleaning and flush away once water enters the system. Refer to manufacturer instructions for product-specific application and safety guidelines to ensure proper use.
- Solder
- Tin-antimony Solder: Contains 95% and 5% antimony. Lead-free and safe for water supply lines. Designed for use in plumbing applications where frequent extreme temperature changes and vibrations occur (refrigeration, cooling equipment and heat ducts); can also be used to solder electronics. Melting range is 450°F to 464°F. Has an unlimited shelf life.
- Copper-tin Solder: Contains 97% tin and 3% copper. Lead-free and safe for water supply lines. Designed for sweating copper and brass plumbing joints. Melting range is 440°F to 572°F. Has an unlimited shelf life.
- Silver-bearing solder: Contains silver, copper, bismuth and tin. Lead-free and safe for water supply lines. Ideal for low-lead brass applications. Has a wide melting range (420°F to 460°F) that enables more time for soldering joints.
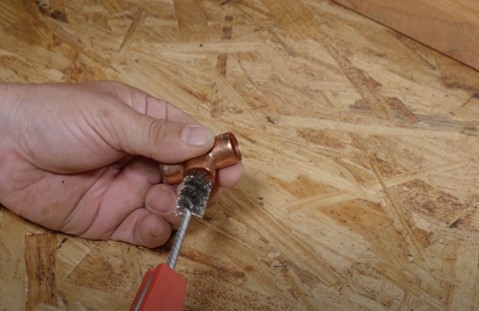
Skipping the Prep
Failure to properly prep both the pipe and fitting is arguably one of the most critical mistakes in the soldering process. To achieve a properly sealed joint, oxidation and oils on the copper surfaces must be removed using special cleaning tools. Otherwise, it’s likely the solder will not completely fill the cup of the fitting, resulting in a weak or leaky joint.
Each of the following steps should be completed as you prep copper pipe for the perfect joint:
- After cutting the copper to the desired length, deburr (or ream) the inside of pipe end using a deburring tool to remove any small bumps or roughness (known as burrs) on the inside diameter or the pipe. If this step is overlooked, pipe pressure will decrease and water flow will be restricted. Any leftover burrs or copper shavings could cause noisy pipes when water enters the system.
- Remove oils and dirt from the outside of pipe end and polish clean with an abrasive sand cloth, open mesh cloth, nylon grit pad or tube cleaning brush. For wet applications, a nylon grit pad or open-mesh cloth are ideal due to their self-cleaning abilities.
- Clean all openings of the fitting hub with a fitting brush.
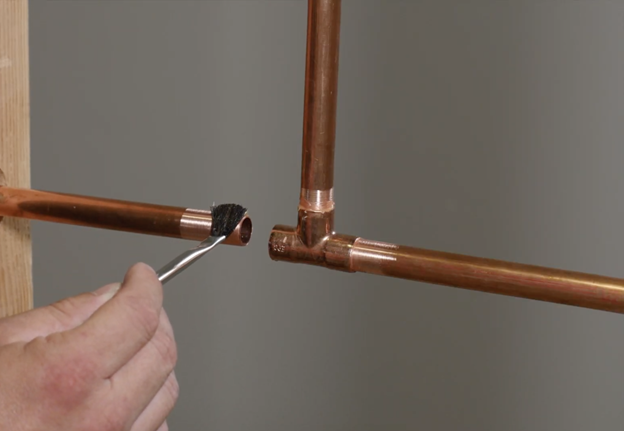
 Applying Too Much Flux
It can be tempting to use a large glob of flux while soldering. However, we recommend evenly applying a thin layer of this product with an acid brush to copper pipe and the inside of a fitting – any excess flux should be removed prior to connecting them.
Applying too much flux will not only result in uselessly wasted product, but could also cause severe pipe damage over time. Once heat is applied to flux it turns to an acid; however, any excess flux will melt and travel through the inside of pipe, which may result in pitting and corrosion.
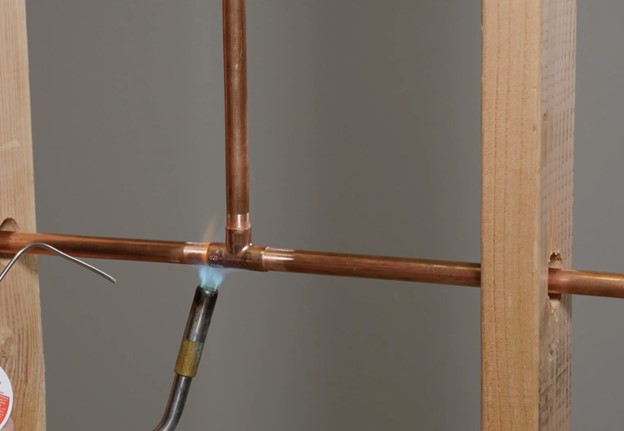
Overheating the Joint
When heating the fitting to sweat the copper pipe, make sure you remove the flame as soon the solder melts. As solder melts, flux will pull the solder into the fitting cup. Too much heat will cause excess solder flow or flux to burn out, which will increase the chance of a leak path.
Pro Tip: Never heat solder directly because you risk melting and breaking it off completely. It’s best to heat the joint evenly and then position the tip of the flame to the bottom of the fitting hub. The solder will flow toward the heat source and ensure the joint is completely filled.
Neglecting Clean Up
While the joint is still warm, immediately wipe away any leftover flux or solder drips with a dry rag to ensure copper pipe longevity. Excess flux may seem harmless; however, it can cause Verdigris, a greenish-blue discoloration commonly found on copper, bronze and brass, to form and destroy copper pipe over time. An old, rusting penny and the Statue of Liberty are great examples of Verdigris in action.
READY FOR YOUR NEXT SOLDERING PROJECT?
For a step-by-step guide on how to solder copper pipe, check out the video below.
 Author’s biography: Sean Comerford is a Technical Customer Service Specialist at Oatey Co. He is a third-generation tradesman with nearly 20 years of plumbing experience, including serving as the lead plumber for commercial/residential new construction, service and fire protection jobs. He holds a State of Ohio Fire Protection License for Sprinkler and Standpipe.

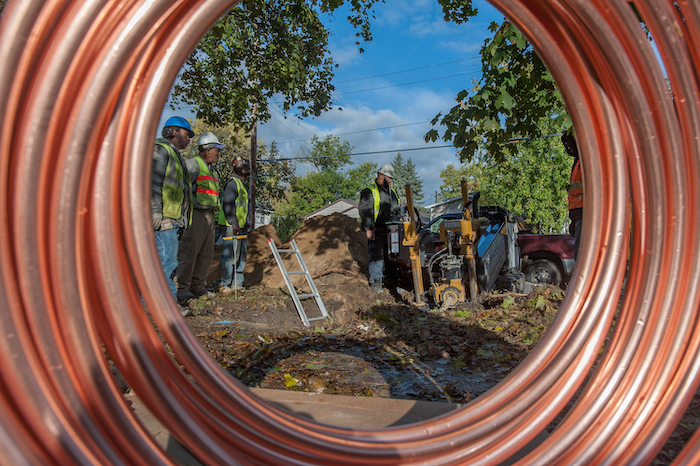
A recent Gallup poll found that 63% of Americans are worried about the safety of their drinking water. Except in extreme cases, these concerns are mostly unfounded as America’s drinking water is among the safest in the World. However, these concerns are understandable considering that the quality of our water is subject to threats old Read more
A recent Gallup poll found that 63% of Americans are worried about the safety of their drinking water. Except in extreme cases, these concerns are mostly unfounded as America’s drinking water is among the safest in the World. However, these concerns are understandable considering that the quality of our water is subject to threats old, like millions of lead pipes, and new chemical contamination from things like PFAS.
Protecting North America’s water safety requires a three-step approach: understanding and recognizing modern water quality threats, specifying safe materials, and following correct installation procedure.
Water Quality Threats
Water quality threats are still abundant. A 2018 study identified 163 different substances that have the potential to leach from common piping materials. These substances range from alcohols to hydrocarbons, ketones, esters, metals, peroxides, phthalates, alkyl phenols, organotins, halogenated compounds and vinyl compounds, including some known or suspected as environmental contaminants or carcinogens. Of these, water quality standards only exist for 89 of them. The other 74 are not currently regulated or understood, leaving a gray area on what effects they may have on our water quality and health.
Replacing lead water pipes with copper piping between the street and homes in Flint, Michigan October 28, 2016. (John M. Galloway)
While additional research may help determine the total effect on water quality and health, these substances are a concern and should be taken into consideration when selecting a piping material.
Specifying with Copper
A reliable way to avoid these threats is to select copper, a time-tested, durable, proven piping material. Copper is safe; it won’t release potentially harmful chemicals into the water, it won’t give off toxic fumes in a fire, and it won’t allow harmful chemicals to permeate through the pipe wall. It is natural—made of 99.9% pure copper—and is accepted by all plumbing codes.
Below, is a brief, step-by-step guide for strong, leak-free solder joints—one of the most common joining methods for copper drinking water systems, provided by the Copper Development Association (CDA). CDA has been instrumental in developing the soldering procedures that are now standard in the copper and plumbing industry, and has since taught these procedures to hundreds of thousands of installers across the country and throughout the world.

Proper soldering technique when working with copper pipe.
To assist contractors and installers, CDA has produced several do-it-yourself videos to its “Do it Proper with Copper” YouTube video series. Additionally, the Copper Tube Handbook, available on www.copper.org, provides additional step-by-step installation guides for all copper joining methods. CDA recommends the following four steps for properly soldering joints:
Step One: Preheat the Tube
First, heat the interior surfaces of the fitting/component with heat from the tube surface. The preheating of the tube should be undertaken with the appropriately sized torch tip directing the flame perpendicular to the tube, about the same distance from the fitting cup as the length of tube that is inserted into the solder cup (i.e. if the fitting cup is 1-inch deep, preheat the tube approximately 1-inch beyond the face of the joint). While there is no definitive time limit on preheating, the tube should be preheated until the flux at the face of the joint begins to become active (begin showing signs of cleaning the tube/fitting surfaces).
Step Two: Preheat the Fitting/Component
Once the appropriate preheat has been applied to the tube, the flame should be moved back onto the fitting/component surface to the base of the fitting cup. Preheating of the fitting is most effective if the torch is directed from the back of the fitting cup to the face of the solder cup. This torch position directs the greatest amount of heat from the back of the fitting cup towards the face, where the solder will be applied. This allows for the primary flame of the torch to concentrate heat into the fitting/component while allowing the secondary flame to keep the tube surface at temperature.
Step Three: Apply Heat and Solder
The copper tube has excellent thermal conductivity so as it is heated, it will conduct heat throughout the tube length inside the fitting space. In addition, as the tube expands into the fitting cup, it will maintain a small capillary space between the two and help to heat the fitting cup from the inside. On horizontal joints, preheating should focus on the bottom two-thirds of the tube. Heat it until the tube is very close to soldering temperature, as indicated by the soldering flux beginning to bubble and clean the surface.

Copper Tube Handbook
Next, move the heat to the base of the fitting cup to bring it up to soldering temperature. Point the torch tip from the face of the fitting cup out towards the tube so the cooler part of the flame continues to keep the tube at soldering temperature. Then apply the heat to the base of the fitting cup. On horizontal joints, that should be somewhere off center near the bottom of the joint, before solder is added. If the solder doesn’t begin to melt, continue to preheat. Once the solder begins to melt, the torch should be moved along with the solder, keeping the heat only slightly ahead of where solder is being applied.
Step Four: Cooling and Cleaning
The completed soldered joint should be allowed to cool slowly and naturally. The new, no-lead alloys may not reject heat as quickly as their predecessors due to their lower thermal conductivity. By controlling the amount of heat applied, an individual can ensure the bare minimum required to facilitate full solder melting and flow is used. This allows the solder to solidify and cool to the joint quickly after the heat is removed.
If the proper soldering procedures are followed, particularly in the preheating and heating process, consistent, high-quality solder joints can be achieved between copper tube and fittings/components.
Durable, Reliable Piping Systems
Compared to copper pipes, no other material has the long history of reliable, leak-free installation in a wide variety of systems and settings, protects the water system from contamination, and does so with proven value. Plus, when copper’s long life cycle finally comes to an end, its high recyclability allows it to be reformed into new products with zero loss of performance. The choice is obvious, the choice is copper.
To learn more about copper piping and installation best practices, visit www.copper.org.
Andrew G. Kireta Jr. is vice president of the Copper Development Association Inc. (CDA). Kireta is responsible for the use of copper and copper alloy systems and products in building construction applications, including plumbing, mechanical and architectural systems.