By: Jason Abajian, North America Water Sales Manager at Resideo Many people have water-leak stories, now there is a solution Winter arrived a bit earlier than usual here in the Upper Midwest, and the moment I saw the projected cold snap, my mind immediately went to the maintenance involved in preparing my home for a long Read more
Industry Blogs

By: Jason Abajian, North America Water Sales Manager at Resideo
Many people have water-leak stories, now there is a solution
Winter arrived a bit earlier than usual here in the Upper Midwest, and the moment I saw the projected cold snap, my mind immediately went to the maintenance involved in preparing my home for a long winter in Traverse City, Mich., where our average snowfall is between 125 inches and 145 inches each year.
Questions like, ‘did I blow out my sprinkler lines so the water doesn’t freeze and crack the copper pipes and sprinkler heads?’ Or ‘is my boiler tuned up and ready for another heating season? I hate to leave my home unprotected.’ It’s my family’s sanctuary and a massive financial investment.
The force that can carve out the Grand Canyon can also carve out massive damage to your home. How can we protect our homes from this great force of nature? Knowledge and preparation are critical.
Water Leaks are on the Rise
Water makes up most of the human body and our earth, it’s more important than food to sustain life, and yet it is the largest menace for home insurance claims. Each year, about one in 60 homeowners files a water damage claim, accounting for 20% of all homeowner insurance claims.
I have inflated this statistic by having dealt with two water damage insurance claims myself. My first claim occurred in 2008. Four days after renting out our home after we struggled to sell it, the renter left a bathtub faucet running upstairs while they were at work and the loft next to the bathroom imploded into the living room below. If that was not bad enough, several years ago my friend’s four-year-old daughter flushed a towel down my current basement toilet and the towel then wrapped around my sewage sump pump and clogged it while the toilet continued to run. I came home late that night to 3 inches of water in the basement. The worst/best part happened when my plumber was replacing my sump pump. He offered me a water leak detector, so I’d be alerted if something like that happened again. The irony was that I already had a sample sitting in a box soaking wet – unused!
Beyond personal residences, think how vital water leak prevention devices can be in multi-family dwellings like condos and town homes, home rentals and even new construction. For example, if you were living in a condo and the property above yours had a pipe burst while your neighbor was away. Your neighbor’s nightmare is now yours, and the property below you and the building management company. Now the home insurance claim isn’t limited to your condo alone.
The same goes for any unoccupied home. Home rentals are notorious for large water damage claims due to faucets and fixtures being left open to run. I know from personal experience. Knowing your water supply line is protected, similar to a connected thermostat communicating your property is properly heating and cooling, is worth the price!

Stopping Water at the Source
The good news is that 93% of water leaks can be prevented. Utilizing well-placed water leak detectors that are connected to a water shutoff valve can help prevent catastrophic water damage. In 2021, Resideo Water Leak and Freeze detectors helped save 3 million gallons of water and helped prevent an estimated $1.9 million in insurance claims.
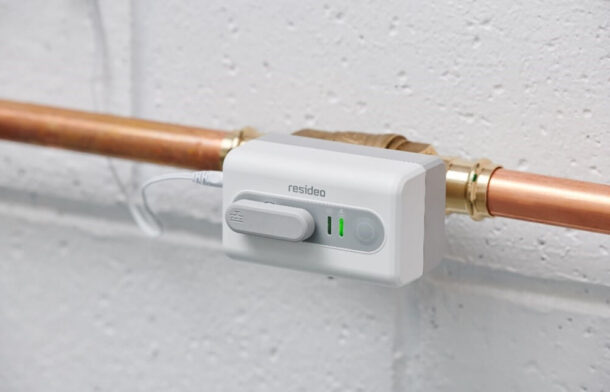
Today, I use Resideo’s new Braukmann L5 WiFi Water Shutoff Valve on my home’s water main and simply shutoff the water flow into my entire home while I travel via the Resideo app. I can also pair Resideo’s WiFi Water Leak & Freeze Detectors in high-risk places and use the actuator’s water sensor cable plugged directly into it – if any part of the cable gets wet, it will close off the actuator stopping water from entering our home. The water cables can be daisy chained up to 500 ft to protect a complete mechanical room. Pipes can leak and burst anywhere throughout the home, especially during the change of seasons, and this product offers me personal peace of mind.
Here are a few additional scenarios that could warrant a water management system and/or leak detection device:
- Air handler in the attic. Using water leak detection devices in or around a condensation pan would be a good idea so as to identify any water damage threat in an unconditioned space.
- Dehumidifier in a crawl space. The average dehumidifier captures 30-70 pints of water per day and this moisture needs to go somewhere. A water leak detector delivers peace of mind when the unit is out of sight.
- Laundry on the second floor. Water damage from a second story can heavily increase the liability of a water damage claims above one’s insurance deductible. A water leak detector will quickly alert you to an issue.
- Tankless water heater installed. If a homeowner has one of these, it’s likely they are resource conscious and may be more interested in reducing the amount of water lost to leaks.
- Sump pump pit. These devices are critical for providing protection to one’s home from ground water. Knowing there is a problem allows you to act before three inches of water fills the entire basement.
- Recent leak damage. Just as my plumber offered me when I had a water damage to my basement – there is no better time to offer water protection than after a customer has felt the sting of a water insurance claim.
What is peace of mind worth to you and your customers? The cost of water is rising like other utilities and so are monthly insurance premiums. Knowing that I do not need to worry about a pipe burst destroying my home and savings account while I visit the in-laws this Christmas will save some of my sanity, and you can’t put a price on that.


A wet basement is a scenario that no homeowner wants to experience, but it is a relatively common occurrence. As it rains, water seeps down and raises the water table. As that water reaches the foundation, it creates what’s known as hydrostatic pressure, placing great amounts of stress on the concrete. That pressure can cause Read more
A wet basement is a scenario that no homeowner wants to experience, but it is a relatively common occurrence. As it rains, water seeps down and raises the water table. As that water reaches the foundation, it creates what’s known as hydrostatic pressure, placing great amounts of stress on the concrete. That pressure can cause various problems ranging from water seeping through the basement cove joint to cracks appearing in your concrete. Only through the addressing of hydrostatic pressure can these problems be stopped.
But not every basement waterproofing system is made the same. Even with an interior basement waterproofing system in place, if the components are not properly installed or well-designed, the system can fail. This means that all that money you spent to fix your basement must be spent again.
This is called tear or rip out, where the original system must be torn out and replaced with a new one.
To keep your basement protected from the effects of intrusive groundwater and moisture, it is crucial to have it waterproofed with quality products and methods that will perform even under serious conditions such as heavy rainstorms.
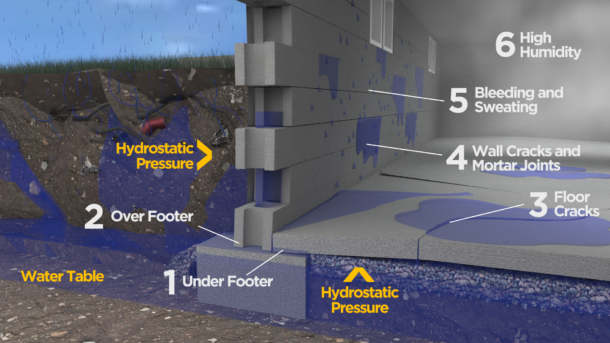
Components in a Basement Waterproofing System
Even if there aren’t cracks in your floor slab or basement wall, water can still seep through the cold joints because of this water pressure (hydrostatic pressure). By targeting this hydrostatic pressure, you can keep the water out of your home. This requires what’s known as an interior basement waterproofing system.
The components for an interior basement waterproofing system typically include:
- Drainage channels, also known as drain tile and sometimes French drains
- A sump pit and a sump pump
Depending on your situation, there may be other components required such as vapor barriers and dehumidifiers. But the main drivers for your basement waterproofing system’s performance are the drainage channels and the sump pump—without these two, there’s no ability to capture and remove incoming groundwater when it rains.
Let’s take a closer look into how to make sure that your drainage channels and sump pump are prepared for any rainy day…
Drainage Channels
Drainage channels can come in different forms and sizes. This is important to know because these channels can affect the performance and longevity of your basement waterproofing system’s drainage ability.
The Most Common Drainage Channels
Commonly used drainage channels tend to come in the form of perforated corrugated channels. The reason corrugated pipe is the most common product is that it’s the cheapest for the contractor to buy.
Corrugated pipe comes in a giant roll, like a garden hose, but it’s wider, from three to four inches wide. But it’s wiggly and difficult to install straight.
There are a number of disadvantages to using corrugated channels including:
The coiled shape of the corrugations creates grooves that trap debris and water, leading to sitting water, debris build-up, and eventually clogged drainage channels.
Corrugated drains are hard to install flat—they tend to bend, rise and dip, leading to an uneven path for water. The potential to trap water rather than flow it towards the sump pit is commonplace.
These drainage channels tend to have small perforations, which means less water is able to enter at any one time, and it can be prone to get clogged by debris.
Even non-corrugated drainage channels may have trouble transporting water fast enough. A round drainage channel can lead to debris settlement, slowing down water flow and eventually clogging.
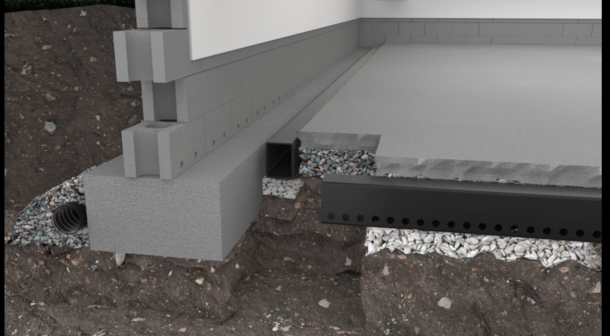
Specially Designed Drainage Channels for Interior Waterproofing
There are two significant design differences in interior drainage channels.
- On-the-footer design
- Beside-the-footer design
These differences make all the difference to draining water from your basement.
- On-the-footer systems are designed to be installed faster and easier but drain less water.
- Beside-the-footer systems require more labor but provide for a larger capacity and faster discharge of water.
The price difference? Negligible.
The Differences in Basement Drainage Channels: On-the-footer vs. Beside-the-footer
- On-the-footer systems are installed on the concrete footer of the home. The footer is built to be perfectly level. This is so that the rest of the structure that sits on the footer has a level starting point. Putting a drainage channel on top of the footer means that the channel is level as well and water in the channel doesn’t drain away until there is a buildup. This slow build-up causes these systems to leak when water enters them quickly – such as during heavier rain storms.
- Beside-the-footer systems are installed deeper and are positioned beside the footer. This allows for pitching or slanting these channels toward the sump pit. Pitching allows for faster drainage. Pitching also allows for all the water to drain, not sit stagnant.
Homeowners may want to note: Contractors that favor the on-the-footer method may argue that the beside-the-footer system places the drainage channels into a “Mud Zone” that leads to fast clogging. But this kind of statement isn’t true and doesn’t contribute to developing an effective solution that meets the needs of homeowners.
Read the next section to see why on-the-footer systems don’t perform as well and why a beside-the-footer system can provide better outcomes.
What to Look for in a Drainage Channel
Your basement waterproofing system needs a drainage channel that fulfils at least these requirements to ensure efficient and long-lasting waterproofing…
- Non-corrugated, smooth, and flat surface to prevent standing water and debris from clogging it.
- High capacity: most of the drainage channels in the market have a capacity of around 1 gallon per foot of channel. This isn’t enough, especially in heavy rain conditions. Check to see that your drainage channel has a higher capacity than 1 gallon per foot.
- Perforations: The drainage channel should have large perforations that can take in more water. But not large enough to let drainage stone in. This is crucial, especially during heavy rain. Perforations should also be situated on two opposite sides to account for water coming through the cold joints as well as water that rises up to meet the foundation.
- On-the-footer systems only allow for water to enter from a single side.
- Deeper is better as the system can start draining water earlier. A beside-the-footer system allows for this.
- As discussed above, ensure the channel can be pitched toward the sump pit. Laying a channel flat, such as with on-the-footer systems, is asking for trouble.
Sump Pumps: The Beating Heart of a Waterproofing System
When the water reaches the sump pit, it is the sump pump that finishes the job by pumping the water out of the basement or crawlspace. By pushing water out of the sump pit and through a discharge pipe, the sump pump moves the water out of your home and to a location away from your foundation. But there are challenges that your sump pump can encounter, especially during a storm…
- Sump pumps can shut down in the event of a power outage.
- Sump pumps can fail at any time due to clogging, faulty or jammed float switches, or other mechanical failures – you won’t know until your system isn’t working.
- The pump gets overwhelmed with too much water and can’t pump it out fast enough. This causes the entire system to back up with water and floods the basement.
- Different sump pumps offer different levels of power. Many systems come standard with a ¼ horsepower pump.
Solutions
To address the first two concerns, consider getting a basement sump pump system with a battery backup pump. A battery backup pump provides a second line of defense in the event that the power goes out or the first pump fails for any reason.
Two things can prevent the system from becoming overwhelmed. A larger standard sump pump and a redundant pumping system will deploy both the main pump and the battery backup pump simultaneously to pump out as much water as the drainage channels can throw at it.
Sump pumps typically provide ¼ horsepower—but there are options that offer higher levels of power.
High-Capacity Protection Against Rainy Days
There are many waterproofing solutions out there, but your home deserves the best. The more prepared your waterproofing system is for heavy rain and other unexpected situations (like power outages), the better protected your home will be. From high-capacity drainage channels to high-powered sump pumps with battery backups, make sure to keep your home safe from all those rainy days with the proper components for quality basement waterproofing!
Todd Prosan is the President and Co-owner of 58 Foundations, a company that provides quality basement waterproofing, crawlspace encapsulation, foundation repair, and mold remediation solutions for homes and commercial properties. For over 30 years Todd has been a leader in the home repair and improvement industry focused on training, product design, best installation methods, business development, and a forefront thinker in the basement, crawlspace, and foundation repair industries.
 Prior to 58 Foundations, Todd was the director of contractor and business development for Grate Products LLC. Todd has also been the president & COO for B-Dry, LLC and as the president and VP of operations for BDS Management Group following a merger of the two brands. During Todd’s tenure, annual revenue increased, operating efficiency improved, and operational and growth strategies were implemented for 11 company-owned markets and 33 franchised locations across the US. Todd coached, trained, and lead ten regional managers and 150+ employees. Todd has also held the positions of VP of Operations for Highway Markings Inc., VP of Operations for Lovell Farms & Envirosafe Laboratories, and Business Development Manager for Professional Manufacturers Representatives.

Let’s face it: no one can work forever. After years of building and managing your HVAC business, you will have to pass the baton to a successor at some point. As the baby boomers generation ages, it’s a cold hard fact that many contractors can no longer keep up with the ever-changing demands of the Read more
Let’s face it: no one can work forever. After years of building and managing your HVAC business, you will have to pass the baton to a successor at some point.
As the baby boomers generation ages, it’s a cold hard fact that many contractors can no longer keep up with the ever-changing demands of the heating and cooling industry. Today, owners of HVAC and other contracting businesses are retiring in droves to move on to the next chapter of their lives. Couple that with record-breaking levels of merger and acquisition (“M&A”) activity in the HVAC sector, and owners have many considerations and opportunities to consider when succession planning.

How prepared are you for that big day in your future?
In today’s dynamic business environment, managing risks associated with planned and unplanned departures is a business imperative that contractors can no longer afford to ignore. Decades-old, highly successful and well-established HVAC businesses, in particular, need proactive succession planning to ensure continued business growth.
Succession planning, however, can be a complex undertaking. It involves identifying and training your successor to ensure your retirement does not disrupt operations. Additionally, it requires creating a robust strategy to maximize the business’s economic value during the ownership transition and manage any taxation and compliance implications. Succession planning also includes considering M&A options for your business.
Throughout the years, we’ve seen how the lack of a well-thought-out succession plan has led to severe financial damages for many HVAC companies. With this in mind, businesses must develop long-term strategies to mitigate risks and ensure a successful transition.
The Importance of Succession Planning for Your HVAC Business
Whether you have no plans of retiring anytime soon, the future is unpredictable. Having a solid, documented succession plan is crucial to your business’s health and fate.
Succession planning allows you to:
- Ensure your management team is aligned with your plans and goals for the company’s future.
- Stay focused on a long-term, bigger-picture vision for the business.
- Protect the business in the event of a sudden major life-changing event.
- Assess parts of your business that may need special attention for your succession plan to be effective.
No matter the size or structure of your contracting business, having a defined succession plan is critical to selecting and developing the best leaders. Extending tenures may prevent the impending headwind, but there is no substitute for a viable long-term succession strategy. After all, business leaders, irrespective of their stature, would inevitably need to make way for the younger generation.
3 Insightful and Actionable Succession Planning Steps
Every business situation requires a different exit strategy. Some existing business owners may want to step out of their position for good. While some would prefer to stay minimally involved to ensure the company’s future success.
Whether you plan to pass your company on to one of your children or trusted employees or sell it to an outside party, succession planning is paramount.
Here are three important things to consider as you plan for your HVAC business succession:
-
Decide Who Will Take Over
Identify who will take the reins when you retire, and give them the opportunity to develop their skills and experience to successfully replace you in the future. Every aspect of business operations should be clearly defined, including detailed role definitions for key decision-makers at various levels. This is especially true for family-owned businesses.
With any luck, you’ve had capable family members or employees who have established themselves in the specific roles they will eventually assume.
If your business is family-owned and operated, it is important to talk to your family members before making succession choices. Ask them if they are interested in taking over the business, and determine if they have the capability to effectively run the company.
Starting your succession plan sooner rather than later gives you more time to hone the knowledge and skills they will need to take over.
On the other hand, if you’ve been anticipating that one of your employees will buy out your business, make sure they have the financial capacity to give you market value for your business along with the skills to sustain its success. Internal transfers are often structured where the owners are paid over time through the profits of the business, so it is important to really assess if your successor has the skills to run the company profitably without you going forward. Otherwise, you’re giving your business to someone who can put your long-term financial security at risk if they cannot execute successfully. This is why many business owners look to third-party M&A to transition their business.
As retirement looms, you must also train them to do the jobs well to ensure that a steady hand will lead from the top down.
-
Determine When the Transition Will Happen
You can’t just flip a switch and hand over the job to your successor with little notice. Think long-term and set a date for your last day in the company. The ownership transition should begin before your last day to give your successor enough time to get accustomed to their new role.
As the existing business owner, you must also invest in the professional development of your succession choice to help them gain valuable experience and boost their soft skills. Let them assume different responsibilities to assess where they might need some additional training and development.
If you’re in a position where you don’t have a qualified candidate to take over, then you need to craft a broader succession plan that enlists a third party to purchase the business. Make sure to find a buyer who values your business the way you do, has the ability to demonstrate consistent earnings and will continue its legacy when you are no longer there.
-
Consider a merger and acquisition (M&A)
When one entity buys another entity and folds it into their organization, that is referred to as an acquisition. In a merger, two equal companies join to form another entity or co-branded company. The timing has never been more perfect for HVAC businesses to consider M&A. More investors are looking for lower-middle-market organizations for M&A activity, and the benefits to you, as a small business owner, are immense.
Rewarding financial returns are one of the reasons business owners turn to M&A. During an M&A, you’ll be able to enhance the price you receive for your company, allowing you to cash in on your hard-earned success and retire with ease. There are also opportunities to create generational wealth by selling portions of your business to a private equity firm. In this scenario, you are able to continue investing, you stay involved in running your company, and you work with the majority owner to generate increased value for your business. Eventually, you’ll be able to liquidate your equity at a larger amount in this second sale of the business.
If you are interested in M&A, it’s never too early to start planning. Price isn’t the only thing to focus on. From determining timing, better understanding your customer relationships and determining what to do with your team, there are seven things to consider when selling your company.
Ignite A Big-Picture Mindset
Changes in the HVAC business happen fast. But through effective succession planning and considering M&A options, you can ensure business continuity. Don’t forget to call in the experts for help with your company’s succession planning. Look for a team with many years of experience, diverse business background and a proven track record in the M&A industry.
Need help with your company’s succession planning? The experts at Align BA are happy to advise you on the best way to create a strong leadership pipeline.
 About the Author: Dena Jalbert is at the forefront of executive leadership within the M&A industry. She is also an award-winning entrepreneur, a mother and a philanthropist. Dena is an outgoing, high-performing, and deeply analytical leader who is passionate about driving business growth through financial discipline, innovation and creativity. Dena is a proven leader whose distinction interlaces a wider-view of business needs to connect the dots between data and business growth strategy. It is this unique strength that has led to repeated successes throughout her career, enabling a different and fresh perspective in building and leading organizations — utilizing innovative strategies to deliver transformations in operations and business results. As a mother of two young girls, Dena is determined to do what she can to advance the opportunities of young girls and women throughout Central Florida.

Small business owners recognize the value of a powerful Customer Relationship Management (CRM) tool. Storing and tracking customer communication history, job data, maintenance agreements, equipment history, and more, the right CRM can help a business grow its customer base and increase revenue. Many of us are most familiar with CRM software and its benefits as Read more
Small business owners recognize the value of a powerful Customer Relationship Management (CRM) tool. Storing and tracking customer communication history, job data, maintenance agreements, equipment history, and more, the right CRM can help a business grow its customer base and increase revenue.
Many of us are most familiar with CRM software and its benefits as it relates to our sales teams. After all, they tend to be the primary users on a daily basis, capturing a wealth of useful customer information. But that same CRM data is a hidden gem for the marketing department as well.
Marketers have their work cut out for them these days. As attentions are scattered across more and more communication platforms, it has become necessary to increase marketing frequency. In fact, a potential customer usually requires about eight touches from a business or brand before a sale happens. Whether a business is looking to develop effective email marketing content, implement automation to assist with hands-free outreach or determine ROI on a campaign, CRM has tools available to help.
Just remember: it’s imperative to obtain the proper permissions from both current and potential customers before adding them to a marketing list. Once that step is taken care of, it’s time to start brainstorming your next marketing campaign and the messages you want to convey to these two different audiences.
For prospective customers, messaging is typically geared towards communicating why you are the best company and why they should want to do business with you. This is the time to separate your business from the competition, making a memorable impression that will stick with them when they go to book their next service appointment.
Since current customers are already familiar with your company and its services, the marketing message usually revolves around offering them special promotions or maintenance service agreements. Businesses may also want to provide them with helpful tips and advice that further position the company as the provider of choice in the industry and market.

CRM Tool #1 – Segment contacts for email marketing
Email newsletters can be a cost-effective marketing campaign solution to convey these different messages to both prospective and current customers. Email can help build relationships with customers and keep them coming back, and they are fairly easy to start. Even better, segmenting contacts into potential customers and current customers is generally accomplished easily within CRM systems.
For prospective customers, a newsletter is a place to feature your company’s products and services, as well as the expertise of your team. You can also include the ever-popular coupons or discounts, which typically attract new customers. They are also a great way to help increase awareness of services your company offers that people may not know about. If there is a type of job you offer but rarely have any customers who book appointments for it, offer a discount and see if it helps with awareness. Discounts are also effective for current customers who may be looking for a deal when it’s time to book an appointment.
Email newsletters also allow marketers to monitor the engagement they are achieving with these important contacts. By tracking open rates and click-through rates, a business can see what content is resonating. Sales can even use that information to follow up with a customer who may have clicked on an offer or link in the email but have not yet booked an appointment or service.
Establishing a routine cadence of email newsletter communication means your list of contacts will be seeing your brand’s name on a regular basis. Your company will be top-of-mind the next time they need a service you offer.
CRM Tool #2 – Automation
CRMs can help with automating outreach such as service reminders for upcoming appointments, maintenance agreement expirations/renewals, or reminders to schedule upcoming maintenance agreement visits. Some CRMs have the ability to create automated email sequences that potential customers will receive at predetermined intervals.
Consider automating a thank you email once a service is complete and including a link to review your business. Remind your customers that the best way to say thanks is by leaving a positive review. If they have easy access to leave a review, customers will be more likely to do so. Establishing a reputation for providing excellent service will go a long way in attracting new customers.
CRM Tool #3 – Track ROI and Lifetime Value
Over time, CRM systems will provide data that helps track the lifetime value of customers and marketing campaigns. Knowing where a customer came from, whether it was a form, website, social media, ad, etc., results in several things.
First, it allows a business to track where it gets the most leads and customer inquiries. Ads may be running on multiple channels, such as social media or local broadcast outlets. Compiling the information on where the leads are coming from helps determine where it’s worth investing more money. If an ad is not performing as well and not resulting in many customer inquiries, you may want to consider stopping the ad and putting that money towards a platform where you see a return.
Businesses can also begin to track the lifetime value of a customer based on jobs they have completed or any maintenance agreements they have. Seeing how much revenue and profit that customer has driven over time and tracking that back to the lead source helps a business determine the lifetime value of its marketing campaigns and lead sources.
These are just some of the ways CRM software can be used to develop effective marketing plans and create new marketing tools that will help recruit and retain customers. Don’t let the sales team have all the fun with CRM; encourage your marketing team to start accessing all of that valuable customer information today.
 Chris O’Grady has been in sales for 30 years, focusing on software sales for the last 20. Chris has been leading and growing sales teams for most of his career, with his most recent positions at FinancialForce and CBORD, where he led high-performing sales teams and was able to help drive tremendous growth for each company. In April 2022, Chris joined Successware as the Chief Sales Officer. He brought with him a proven history of business growth and increased sales performance. In his current role, Chris leads sales, sales operations, and customer success and is responsible for driving sales strategy.

With travel getting back to normal and industry trade show season in full go-mode, the Mechanical Hub team has been talking with a lot of manufacturers and contractors about the challenges of the past two years and what everyone sees on the horizon. One of the hot topics recently has been the Employee Retention Tax Read more
With travel getting back to normal and industry trade show season in full go-mode, the Mechanical Hub team has been talking with a lot of manufacturers and contractors about the challenges of the past two years and what everyone sees on the horizon. One of the hot topics recently has been the Employee Retention Tax Credit (ERC). Enacted alongside the Paycheck Protection Program (PPP) in 2020, the ERC was widely overlooked until recently. We asked our professional friends over at Omega Accounting Solutions to share some insights into the program and here are their tips.

When the COVID-19 pandemic began to shut down businesses across the U.S., significantly impacting the economy, the federal government intervened by authorizing billions in economic stimulus through the PPP and the ERC program.
The ERC program gave eligible employers a payroll tax credit for continuing to employ Americans during the pandemic. Many employers took out SBA-guaranteed PPP loans in 2020 but bypassed the ERC. In subsequent legislation, the ERC was made available to more ailing businesses, including those who received PPP funds. Many more businesses qualified for ERC money than claimed it.
______________________________________________________
APPETITE FOR CONSTRUCTION PODCAST
 Did we hear that right? The IRS would write us a check? What is the Employee Retention Credit and who is eligible? The boys take this bonus episode to talk with Omega Accounting Solutions’ J.P. Lowry all about this credit and why business owners need to take advantage of it.
______________________________________________________
Construction companies that have already taken advantage of the ERC have received hundreds of thousands of dollars in return from the government because they overpaid payroll taxes during the pandemic. Qualifying through gross receipts, an electrical contracting company in California received an ERC refund of $2.6 million from the IRS. Through gross receipts, a construction company in Texas acquired a $975K ERC refund. Through suspension of services, a landscaping company in Utah received an ERC refund of $437K.

5 Reasons Why Construction Companies Should Apply
- Most Businesses Qualify: Construction companies may qualify if they had to close or limit capacity due to government closures, supply chain issues or distancing requirements.
- Projects/jobs were suspended due to government orders
- Materials suppliers were unable to make deliveries of critical goods
- Operating hours were affected by curfew or cleaning protocols
- Social distancing requirements reduced crew sizes
- Receive up to $26,000 per employee: When first introduced as part of the CARES Act in 2020, the maximum credit allowable under the ERC was $5,000 per employee. With its renewal and expansion under the Consolidated Appropriations Act (CCA), 2021, the maximum credit increased to $21,000. When the ERC and the PPP were rolled out under the CARES Act, businesses had to choose which to use. Many selected PPP because it was easier to sign up for a Small Business Administration-backed loan than to learn the details of eligibility for ERC. However subsequent legislation expanded the eligibility requirements for employers so that they could now receive both, making this a can’t-miss opportunity for construction businesses.
- It’s Retroactive: Though the Infrastructure Investment and Jobs Act (IIJA) of 2021 moved up the ERC’s expiration date, effectively repealing the program for the fourth quarter of 2021, construction companies are still allowed to submit their payroll tax filings for the covered periods. Employers who filed their payroll taxes in 2020 were able to deduct the money directly from their quarterly payroll taxes at that time. Those who didn’t file in 2020 or who are claiming the ERC for the first time on their payroll taxes in 2021 will be refunded for quarterly filed periods.
- It’s a Cash Refund: The ERC is a federal credit determined by a business’ quarterly payroll taxes, not the business’ taxes, and based on how many full-time employees (30+ hours) the company had during the eligibility period. The credit calculation is based on qualified wages paid per employee each quarter. In 2020 the refundable tax credit was 50% of qualified wages up to a $5,000 maximum. In 2021 it was 70% of qualified wages up to $21,000. The IRS issues a refund check in the amount of the credit claimed.
- It’s Easier Than You Think: If a construction business meets the eligibility requirements for the ERC, the credit can be claimed on previously filed payroll tax forms. ERC specialists working in accounting departments and for tax preparers can quickly evaluate whether a company is entitled to the credit and provide any needed guidance. If the criteria are met, these professionals can file amended payroll tax returns for the qualifying quarters and submit them to the IRS.
https://youtu.be/wnvLJr1C96g
Find out if your company qualifies for the ERC by clicking this link: https://bit.ly/mechanicalhub
In addition to the ERC, the federal government has introduced other credits designed to help businesses weather the long-term effects of the pandemic and to encourage both innovation and the employment of American workers. Companies should talk with their tax preparers about these additional credits available to them including the Research & Development (R&D) tax credit, available to companies developing new or improved business components, and the PPP forgivable loan program, also established during the CARES Act and implemented and backed by the Small Business Administration.
For over 15 years, Omega Accounting Solutions has been a champion of small- to mid-sized businesses, empowering owners to make informed business decisions. As an accounting and data firm, Omega helps business owners navigate the complexities of the accounting process, particularly for the enormous opportunities around the Employee Retention Credit. Omega has a documented process for the ERC and limits risk for clients. Over $350 million in ERC cash has been recovered for Omega clients, spanning across an impressive range of industries. For more information about qualifying for the ERC and receiving a free evaluation from Omega Accounting Solutions, visit https://bit.ly/mechanicalhub
