Whether completing repairs, a remodel or a new build, having the right pipe connections is paramount to completing a quality project. There are a lot of plumbing technologies available to pros, but not every option improves a project’s quality and efficiency like push-to-connect fittings. The leader of push-to-connect plumbing, SharkBite, wants to reiterate the importance of using Read more
CPVC
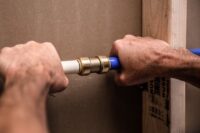
Whether completing repairs, a remodel or a new build, having the right pipe connections is paramount to completing a quality project. There are a lot of plumbing technologies available to pros, but not every option improves a project’s quality and efficiency like push-to-connect fittings. The leader of push-to-connect plumbing, SharkBite, wants to reiterate the importance of using the best tools available, knowing quality products will help plumbers complete jobs fast and with confidence. In doing so, the Reliance Worldwide Corporation (RWC) brand is underscoring the reasons its fittings are always an asset on pros’ trucks:
- They’re compatible with PEX, copper, CPVC, HDPE and PE-RT, polybutylene and PVC pipes, allowing pros to transition from one pipe to another in any combination.
- Fittings don’t require tools, soldering or glue.
- They can be installed without having to wait for pipes to dry.
- Fittings can be buried once wrapped in self-adhering silicone tape.
- They can be installed behind the walls.
- They’re easy to install in tight spaces.
With these capabilities, push-to-connect fittings save time on the job site, improving versatility, efficiency and quality for pros. If you’d like more details to share with your audience, please reach out. I’d be happy to set up an interview, discuss a byline opportunity or provide further information.
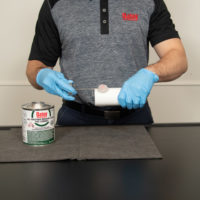
Solvent welding in a cold environment presents challenges that have to be counterbalanced. Why? Pipe and fittings take longer to soften in colder weather. The pipe is also more resistant to solvent attack, so softening it with an aggressive primer is important during cold weather. By following certain cold-weather solvent welding instructions, and demonstrating patience Read more
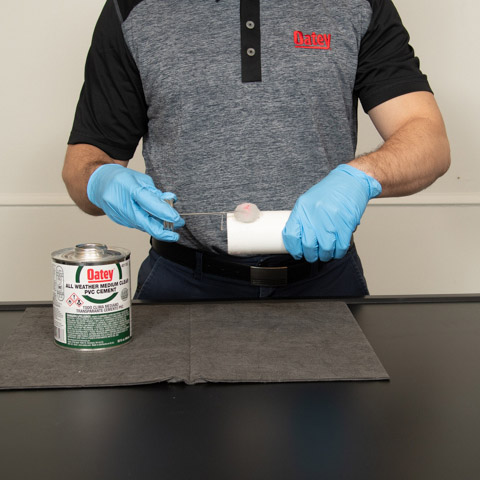
Solvent welding in a cold environment presents challenges that have to be counterbalanced. Why? Pipe and fittings take longer to soften in colder weather. The pipe is also more resistant to solvent attack, so softening it with an aggressive primer is important during cold weather.
By following certain cold-weather solvent welding instructions, and demonstrating patience, you can successfully solvent weld pipe joints in sub-zero temperatures (as low as -15°F).
We’re sharing seven tips to ensure successful solvent cemented pipe joints during the cold winter months.
-
Prefabricate as much of the piping system as possible in a warm environment.
We recommend assembling as much of the piping system as possible in a heated work environment. If you can control the temperature, it’ll make for better joints.
Any joints that must be made at the assembly work-site should be protected by some sort of temporary or portable shelter.
-
Store cement and primers in a warmer area.
Colder applications will require storing your pipe cement in a warmer environment (above 40°F). It’s important not to leave solvent cement outside in the cold for an extended period because it will take on a gel-like consistency. If the cement has gelled, we do not recommend using it. Solvent cement should remain fluid.
If you have bulk items on the jobsite, be sure to store them in a temperature-controlled area so it doesn’t come in contact with the cold.
Maybe you keep your cement and primers on your truck dashboard while you’re traveling between jobsites. In that case, if you’ve been out for a couple of hours, we recommend bringing them inside after your last service call. That way, the product can get acclimated to the warmer temperature and reach the right consistency for your next project.
-
Remove moisture from the ends of pipe and surfaces.
Before starting the solvent welding process, take time to clean off pipe ends and fittings to remove any dampness, residual water or ice. If moisture penetrates the cement, it will cause it to gel.
Of course, wet or damp conditions are sometimes unavoidable. In that case, we recommend using a solvent cement formulated to cure in damp conditions, like Oatey Rain-R-Shine, a fast-set cement designed for wet conditions.
-
Aggressively apply primer to fittings and pipe.
Particularly in colder applications, be sure to apply and aggressively work in primer. Primer must be used to create a solvent weld on PVC and CPVC pipes. Oatey Purple Primer is an NSF-listed primer for use on all schedules and classes of PVC and CPVC pipe and fittings.
To understand the importance of applying primer, it may be helpful to think of the fitting and the pipe as your skin. Your pores are coated and closed tightly; working the primer more aggressively onto the fitting and the pipe will ensure that you open up the pores. That way, you are preparing the pipe to accept the cement.
While applying primer to fittings and pipes, be sure to re-dip between each application. Once you have primed the pipe and the fitting, you have five minutes to apply cement and finish the connection. Waiting too long will negatively affect the creation of a good solvent weld.
-
Vigorously shake or stir cement before usage.
Before every use, we recommend shaking the can or stirring its contents before application. That’ll help blend in the components of the cement, making sure you get an even consistency throughout.
-
Allow a longer cure time before testing or using the system.
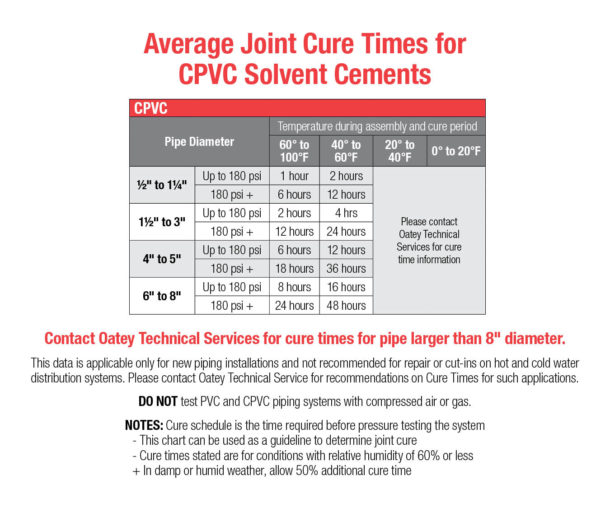
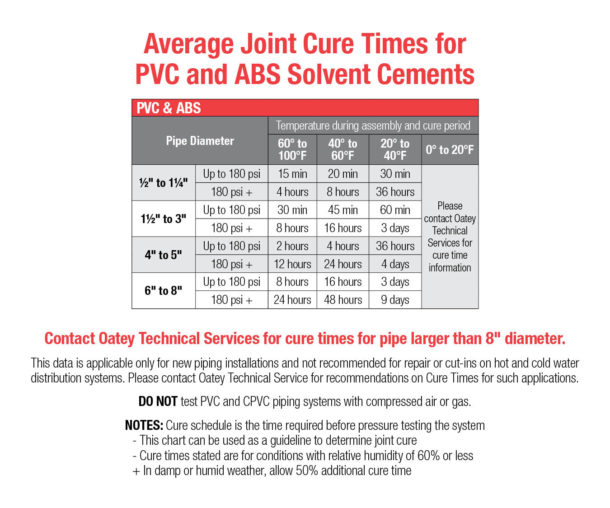
Cure time depends on several factors: pipe material, pipe size, ambient temperature and humidity. However, solvent cement will take longer to cure in colder temperatures. Allow enough time for the solvents to evaporate before testing the system or putting it in service.
In temperatures between 20°F to 40°F, the joint may take up to three days to fully cure for higher pressure applications. However, be sure to refer to the average joint cure times provided by the manufacturer for PVC, ABS and CPVC solvent cement. For temperatures below 20°F, we recommend contacting Oatey Technical Services for exact cure time information.
Do not attempt to speed up the cure time by applying direct heat to the joint because that could deteriorate joint strength or affect the integrity of the pipe.
However, you can create a temperature-controlled environment to accelerate the process. If you have a temporarily heated area, you may close off the openings of the dwelling to help speed the process while leaving your pipe ends open so that airflow can enter the system and help the solvents evaporate.
View our overview document for more information on all our cement offerings and their cure/set times.
-
Follow all ASTM standards and steps.
It’s important to follow all ASTM standards and steps in the solvent welding process. Be sure not to skip any when preparing the pipe — for example, choosing not to chamfer the pipe.
If you don’t chamfer the pipe or bevel the outside edge, the sharp edges can scrape the cement off the walls of the fitting, as the pipe is being inserted. This could potentially cause blockage or leak paths.
In colder temperatures, it is especially important not to skip these steps because the cold makes creating a solvent welded joint more challenging. To ensure you follow all ASTM standards and create a perfect solvent weld, avoid these five common solvent welding mistakes.
With our application tips for cold-weather solvent welding, you’re well on your way to creating long-lasting, leak-free connections this winter.
Author’s biography: Sean Comerford is a Technical Customer Service Specialist at Oatey Co. He is a third-generation tradesman with nearly 20 years of plumbing experience, including serving as the lead plumber for commercial/residential new construction, service and fire protection jobs. He holds a State of Ohio Fire Protection License for Sprinkler and Standpipe.
Two directors discuss how switching from PEX-b pipe with crimp-style fittings to Uponor PEX-a pipe with ProPEX® expansion connections made a big impact on their business. Kimbel Mechanical Systems is one of the nation’s preeminent mechanical contractors, specializing in plumbing, HVAC, and electrical work in more than a dozen states on both sides of the Read more
Two directors discuss how switching from PEX-b pipe with crimp-style fittings to Uponor PEX-a pipe with ProPEX® expansion connections made a big impact on their business.
Kimbel Mechanical Systems is one of the nation’s preeminent mechanical contractors, specializing in plumbing, HVAC, and electrical work in more than a dozen states on both sides of the country — from Montana to Massachusetts. Headquartered in Fayetteville, Ark., Kimbel currently maintains 12 regional offices, including six in Arkansas, three in Colorado, and one each in Tennessee, Missouri, and Oklahoma.
The company was originally established as a one-person, new-residential plumbing shop in 1984 in northeast Ohio. A decade later, founder Miles Kimbel relocated and reconstituted his firm 900 miles southwest to pursue new opportunities in Arkansas. Fast-forward a few more years, and Miles’ son Rob Kimbel took over the reins, broadening the company’s reach to include mid- to large-scale multifamily projects, as well as single-family residential.
Residential plumbing with Uponor PEX-a and ProPEX fittings.
While the residential side of the business is still mainly involved in single-family work, the commercial side encompasses multifamily projects, hotels, schools, military housing, assisted-living facilities, and other types of large-scale structures. The company’s total number of employees exceeds 500, and they also rely on a large pool of subcontractors for their commercial work.
Several years ago, directors in both halves of Kimbel’s business found themselves struggling with “huge” and mounting warranty problems caused by damaging pipe leaks — damaging to the properties in which the product had been installed, as well as to the company’s professional reputation.
As a result, they decided to begin transitioning away from PEX-b pipe with crimp-style fittings and start using Uponor PEX-a pipe with ASTM F1960 ProPEX® expansion connections for their plumbing projects.
Hear Kimbel’s journey firsthand from Ryan Pinkerton, Director of Operations in Colorado and Tennessee, along with his colleague Mark Evans, Director of Pre-Construction – Commercial Housing, as they detail the factors that drove the company-wide shift, as well as the beneficial impact Uponor PEX-a and the ProPEX expansion method have subsequently had on both sides of their business.
Residential plumbing with Uponor PEX-a and ProPEX fittings.
Residential: Ryan Pinkerton, Director of Operations, Colorado and Tennessee
What is the primary piping product your company uses?
PEX is the known method among the single-family homebuilders we work with today. We might use Schedule 80 CPVC for pipe runs larger than two inches — mains and so forth. But, the majority of our single-family housing work is PEX.
How long have you been using PEX?
We began using PEX not long after I entered the plumbing trade 15 years ago. At that time, for our residential work, we were using PEX-b from another brand. However, we were having so many leaks with the crimp-style connections.
What were some of the issues you encountered with PEX-b crimp connections?
Over-calibrating was an issue. Because you can over-calibrate crimpers, it created a weak spot in the fitting that can crack under use. Also, if you position the crimp ring too far back, it can hold under the air test, but blow off when you turn on the water. The problems were huge, ongoing, and cost us hundreds of thousands of dollars in repairs.
Why did you switch to Uponor PEX-a pipe and the ProPEX® fitting system?
We needed to decrease our warranty costs to repair crimp connections as well as improve the relationships with the homebuilders we served. We also liked the increased water flow that the Uponor system provided. Crimp-style connections reduce the diameter of the PEX-b pipe and, as a result, lower the flow rate. That’s not the case with the ProPEX expansion-type fitting on PEX-a pipe. That has been a key, positive factor for us with the switch.
Commercial: Mark Evans, Director of Pre-Construction – Commercial Housing
Why did your commercial team choose to make the switch?
We use contract installers, and we had so many different people doing the work, it was hard to maintain quality with crimp. The Uponor ProPEX expansion method and the simplicity of the expansion tool for making PEX-a connections worked a lot better for us.
Were there issues with other piping products?
We had numerous leak issues with our larger water mains where we used CPVC at the time. CPVC joints are only as good as the installer who glues them. Once we learned Uponor offered PEX-a in larger diameters, that opportunity to reduce our water-main leak problems also helped drive the switch to Uponor.
Was it difficult for your workers to switch?
Uponor came to our job sites to train our crews on the ProPEX connection method. This training was quick and simple. Once we got everyone on board, the leaks went down drastically. Additionally, our contract plumbing installers are now faster and more productive with Uponor PEX-a. Although most of our contract installers work only for us, we still pay them for piecework. As a result, installation speed really matters for these independent contractors. They know that if you are not fast, you are not profitable. Thanks to the training they received, these contract installers are now familiar working with PEX-a. They have learned to install it quickly without mistakes.
To learn more about Uponor training opportunities for your team, visit uponor.com/training. To learn how Uponor can help bring greater productivity and performance to your residential or commercial projects, visit uponor.com.
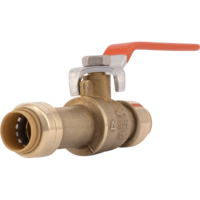
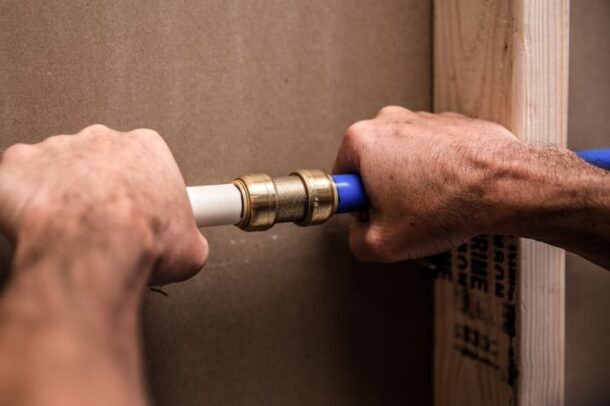
As the deep winter freeze arrives, frozen or burst pipes can become prevalent. Dealing with an unexpected leak is the last thing anyone wants to tackle in the middle of a busy season; but if it happens, there’s a quick solution to restoring ruptured pipes with no specialty tools, soldering, crimping or glue required: SharkBite push-to-connect Read more
![]() As the deep winter freeze arrives, frozen or burst pipes can become prevalent. Dealing with an unexpected leak is the last thing anyone wants to tackle in the middle of a busy season; but if it happens, there’s a quick solution to restoring ruptured pipes with no specialty tools, soldering, crimping or glue required: SharkBite push-to-connect slip and transition fittings.
As the deep winter freeze arrives, frozen or burst pipes can become prevalent. Dealing with an unexpected leak is the last thing anyone wants to tackle in the middle of a busy season; but if it happens, there’s a quick solution to restoring ruptured pipes with no specialty tools, soldering, crimping or glue required: SharkBite push-to-connect slip and transition fittings.
“SharkBite gives you a wide range of slip fittings and valves to repair burst copper or CPVC pipes quickly,” said Michael Kornegay, SharkBite Product Manager. “Up to two inches of damaged pipe can be removed using a single fitting, even in wet lines, and a drain valve can be easily added to prevent future freezing.”
Ideal for working with multiple pipe types and in tight spaces, SharkBite’s Brass Push transition fittings can be installed in wet lines and can transition between pipe types, including PEX, copper, CPVC, PVC, polybutylene, HDPE and PE-RT pipes, making them one of the most versatile solutions.
“SharkBite’s push-to-connect transition fittings come with color-coordinated collars for each specific pipe material,” Kornegay continued. “The tool-free transition fittings allow for quick and easy repair of copper pinhole leaks and replacement of brittle polybutylene pipe or broken CPVC.”
Since pipes are at a higher risk of freezing and bursting in the winter, it pays to have a solution like SharkBite’s push-to-connect slip and transition fittings handy for a quick fix. Follow these steps to get the job done fast:
- Cut the pipe cleanly – Be sure the pipe is clean of scratches or debris. If working with copper pipe, use a deburr tool or sandpaper to remove any sharp edges or burrs.
- Measure and mark the insertion depth – Use SharkBite’s Deburr & Gauge Tool to mark the insertion depth on the damaged pipe.
- Make the connection – Push the fitting to the insertion marks. Then, turn on the water and check the connection.
When it comes to repairing a burst, frozen pipe, SharkBite push-to-connect slip and transition fittings save time. Pipe transitions make working with PEX, copper, CPVC, PVC, polybutylene, HDPE and PE-RT pipes hassle free, and SharkBite offers the flexibility of repairing the damaged pipe in wet lines under full flow.
“Just cut, push and done,” Kornegay said. “These SharkBite products allow you to quickly repair those frozen, burst pipes in a short amount of time, so you can finish a job with ease and move on to the next.”
Learn more about SharkBite’s repair options at SharkBite.com.
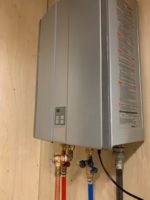
The Plastics Pipe Institute, Inc. (PPI), has published a new recommendation related to the direct connection of plastic piping materials CPVC, PE-RT, PEX, and PP to tankless water heaters. Available on PPI’s website, PPI Recommendation H Direct Connection of Plastic Piping Materials to Tankless Water Heaters for Domestic (i.e. residential) Applications provides clear guidance on Read more
The Plastics Pipe Institute, Inc. (PPI), has published a new recommendation related to the direct connection of plastic piping materials CPVC, PE-RT, PEX, and PP to tankless water heaters.
Available on PPI’s website, PPI Recommendation H Direct Connection of Plastic Piping Materials to Tankless Water Heaters for Domestic (i.e. residential) Applications provides clear guidance on the question of direct connection of these piping materials to tankless water heaters. PPI is the major trade association representing the plastic pipe industry.

“PPI Recommendation H answers questions which plumbers and builders have been asking about whether it is appropriate for plastic pressure pipe materials to connect directly to the cold-water inlet and hot-water outlet of domestic tankless water heaters, without the use of metallic flex connectors. Based on our research, these direct connections are usually acceptable,” explained Lance MacNevin, P. Eng., director of engineering for PPI’s Building & Construction Division.
“To help answer this question, PPI and our members researched Canadian and US model plumbing codes,” he continued, “reviewed the published literature on dozens of tankless water heaters, and confirmed the recommendations of plastic piping system manufacturers. Based on the proven high-temperature capabilities of these piping materials and the relatively consistent water temperature control of modern tankless water heaters, there is no technical reason to prohibit direct connections. Of course, installers must follow local code requirements and the manufacturer installation instructions.”
“As stated in Recommendation H: Piping systems using the materials CPVC, PE-RT, PEX, and PP, which carry a pressure rating of 100 psi at 180°F (690 kPa @ 82°C), and which are intended and certified for hot and cold potable water distribution systems according to industry standards and relevant codes, may be connected directly to tankless water heaters which are intended for domestic (i.e. residential) applications, unless prohibited by local plumbing code or the specific water heater manufacturer.”
According to PPI President David Fink, “The research on this topic was prompted by an inquiry from a major builders group. The rapid development of Recommendation H demonstrates the ability of PPI members to collaborate and respond quickly to industry questions about responsible usage of plastic piping materials.”
Published on PPI’s website directly at recommendation-h-direct-connection-tankless, Recommendation H is one of several PPI documents related to the design and installation of pressure pipe materials for plumbing and mechanical applications, which are all published as a service to the industry. Additional information about PPI’s Building & Construction Division can be found at plasticpipe.org/building-construction/index.html.