By Sean Comerford Silicone sealant is an essential tool for plumbers and contractors alike. Known for its flexibility, durability, and water resistance, it proves invaluable across a broad spectrum of plumbing applications, effectively sealing everything from air to water. This article delves into advanced techniques and best practices for using silicone sealant and offers unconventional Read more
Sean Comerford

By Sean Comerford
Silicone sealant is an essential tool for plumbers and contractors alike. Known for its flexibility, durability, and water resistance, it proves invaluable across a broad spectrum of plumbing applications, effectively sealing everything from air to water. This article delves into advanced techniques and best practices for using silicone sealant and offers unconventional uses for plumbing situations.

Advanced Techniques for Using Silicone Sealant
Proper Application Methods: The effectiveness of silicone sealant largely depends on how well it is applied. Ensure the application area is clean, dry, and debris-free. Use a caulking gun to apply a continuous bead of sealant, maintaining steady pressure to avoid air bubbles. Smooth the bead with a caulking tool or your finger dipped in soapy water to achieve a clean finish.
Accurate Sealing in Difficult Areas: Sealing tight or awkward spaces can be tricky. Utilize specialized tools like angled nozzles and flexible extension tubes to reach narrow gaps and corners. When dealing with vertical surfaces, apply the sealant from the bottom up to prevent sagging.
Enhanced Bonding to Various Materials: Silicone sealant is highly effective in bonding various materials, including glass, metal, and plastic. For optimal adhesion, choose a sealant compatible with the specific materials you are working with. Apply a primer if recommended by the manufacturer to enhance bonding strength, especially on non-porous surfaces.
Leveraging Tools for Maximum Performance: Leverage tools such as caulking guns with adjustable pressure settings, smoothing spatulas, and silicone finishing kits to refine your application. These tools improve the quality of your work and increase efficiency, allowing for faster completion times.

Best Practices for Silicone Sealant Application
Surface Preparation: Proper surface preparation is crucial for a successful seal. Clean the area thoroughly with a degreaser or alcohol-based cleaner to remove any oils or residues. Use a wire brush or sandpaper to roughen smooth surfaces, ensuring better grip for the sealant.
Choosing the Right Type of Silicone Sealant: Different plumbing tasks require different types of silicone sealant. For example, opt for high-temperature silicone for areas exposed to heat, while mildew-resistant sealant is ideal for bathroom and kitchen applications. Read product labels carefully to select the appropriate sealant for your specific needs.
Handling and Curing Considerations: Proper handling and curing are vital for the longevity of the seal. Store sealant tubes in a cool, dry place and ensure they are within their expiration date. After application, allow sufficient curing time as specified by the manufacturer, typically 24 to 48 hours. Avoid exposing the sealant to water or extreme temperatures during this period.
Maintenance and Longevity Strategies: To extend the life of your silicone seals, conduct regular inspections and touch-ups as needed. Remove and reapply sealant if you notice any signs of degradation, such as cracking or peeling. Use UV-resistant silicone for outdoor applications to prevent damage from sun exposure.
Unique or Less-Known Applications of Silicone Sealant in Plumbing
Downspouts: Silicone sealant can effectively seal seams and joints on downspouts in residential and commercial buildings. It can be especially beneficial in regions with heavy rainfall or snowfall, where water can easily penetrate cracks and weaken the downspout’s structure. It can also help reinforce the connections between different sections of the downspout, ensuring a secure fit that can withstand harsh weather conditions.
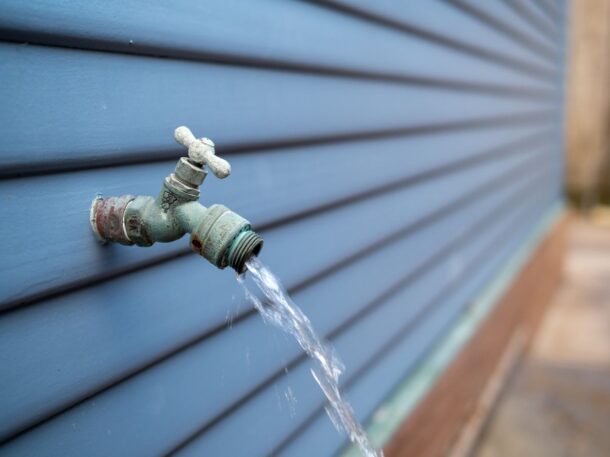
Hose Bib: When installing or repairing a hose bib, consider using silicone sealant around the base where it meets the wall to reinforce the bond. This watertight seal can prevent leaks and potential water damage while ensuring a secure connection capable of withstanding external stressors. Silicone’s elasticity allows it to expand and contract without losing its seal, making it perfect for outdoor applications.
Sewage Ejectors or Sump Pumps: When dealing with sewage ejectors or sump pumps where pipes protrude through a basement wall or foundation, consider applying a silicone sealant to create a watertight seal and prevent any potential leaks or seepage. This serves to protect the surrounding area from water damage and corrosion while also ensuring the efficient operation of the pump.
Roof Penetrations: Silicone sealant can serve as a viable temporary solution for addressing roof penetrations when immediate repair of the roof flashing is not feasible. By applying silicone sealant around the area of the roof penetration, a temporary barrier is created to prevent water leaks and potential damage until a permanent fix can be implemented by a professional roofer. This quick and easily accessible option can provide temporary relief and protection until the repair can be completed.
Silicone sealant is an indispensable product in the plumbing industry, offering versatility and reliability for many applications. Its superior water resistance, flexibility, and ease of use make it a preferred choice among plumbing professionals. By following these techniques and best practices and exploring unique applications, plumbers and contractors can maximize silicone sealant’s benefits.
 Sean Comerford is a Technical Applications Manager at Oatey Co. He is a third-generation tradesman with nearly 20 years of plumbing experience, including serving as the lead plumber for commercial/residential new-construction, service and fire protection jobs. He holds a State of Ohio Fire Protection License for Sprinkler and Standpipe.
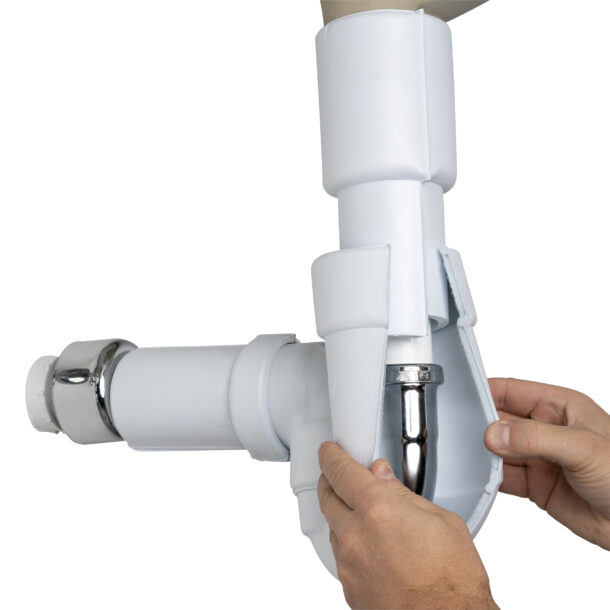
Choosing the right tubular for your project is essential as a professional plumber. Not only does it need to be functional, but it also needs to be cost-effective, durable, and aesthetically pleasing to your clients. This article will guide you through decision-making, weighing the pros and cons of brass and plastic materials, thickness options, and Read more
Choosing the right tubular for your project is essential as a professional plumber. Not only does it need to be functional, but it also needs to be cost-effective, durable, and aesthetically pleasing to your clients.
This article will guide you through decision-making, weighing the pros and cons of brass and plastic materials, thickness options, and specific applications.
Material Options: When selecting tubular products, you typically choose between brass and plastic materials. Brass tubular products (typically chrome-plated) are more durable and elegant, often used in higher-end or commercial projects. On the other hand, plastic tubular products (or polypropylene materials) are more affordable, easier to cut, and offer corrosion resistance. If you are working on a plumbing project with a tight budget, plastic tubular products may be the better option. Additionally, they are ideal for under-sink applications where aesthetics are less crucial.
 Factoring in the application is also crucial. For instance, there are certain scenarios where brass is unsuitable, such as in science labs or some dentist’s offices. The waste materials in these settings can be highly corrosive to metal, which could cause significant damage over time. In such cases, a plastic trap can be advantageous because plastic does not corrode and is generally unaffected by most chemicals.
Unlike PVC/ABS pipes, plastic tubular products (or polypropylene materials) cannot be assembled with solvent cements but require slip nuts and washers.
Thickness Options: If you choose brass tubular products, you will need to consider the thickness options available. Brass tubular products come in three thicknesses: 17 gauge (commercial grade), 20 gauge (mid-range thickness), and 22 gauge (budget grade). The thicker the product, the more expensive it will be; however, it will also be more durable. If you are working on a commercial-grade project requiring more durability, you may consider using 17- gauge brass products. But for smaller residential projects, 20 or 22-gauge brass products will suffice.
On the other hand, all Oatey plastic tubular products are schedule 10 in thickness.
Size: The most common tubular product sizes are 1-1/4″ and 1-1/2″. These are available in brass and plastic products. The trap adapter connection to the branch drain in the wall will determine the largest tubular product that can be connected with a slip nut and washer. This point of connection can also be reduced for 1-1/4″ tubular assemblies with a reducing washer and slip nut. Bathroom sink installations usually are completed with 1-1/4″ products, but 1-1/2″ products will work. Kitchen sink installations can only be completed with 1-1/2″ products.
Specific Applications: To choose the right tubular for your project, you need to know the specific applications available. Oatey offers a wide range of tubular products for various applications, including P-Traps, S-Traps, Wall Bends, Extension Tubes, and more. Additionally, they provide covers for ADA sink installations, including center/end outlet waste covers and P-trap covers. You must choose the right application for your project, ensuring it fits correctly with other plumbing components.
When selecting the best tubular products, consider the application. Oatey offers a variety of tubular products, including P-Traps, S-Traps, Wall Bends, Extension Tubes, and more, all designed for specific applications.
Here are examples of tubular applications and the appropriate tubular product for each.
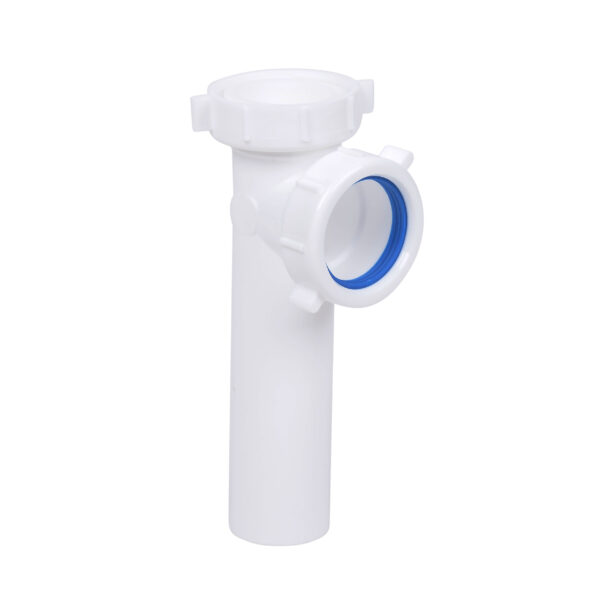
- P-Traps: Ideal for under-sink installations, P-Traps are designed to prevent sewer gases from escaping into your home. They are most commonly used in bathroom and kitchen sinks.
- S-Traps: S-Traps are similar to P-Traps but are no longer approved for installations and are primarily in older homes and buildings.
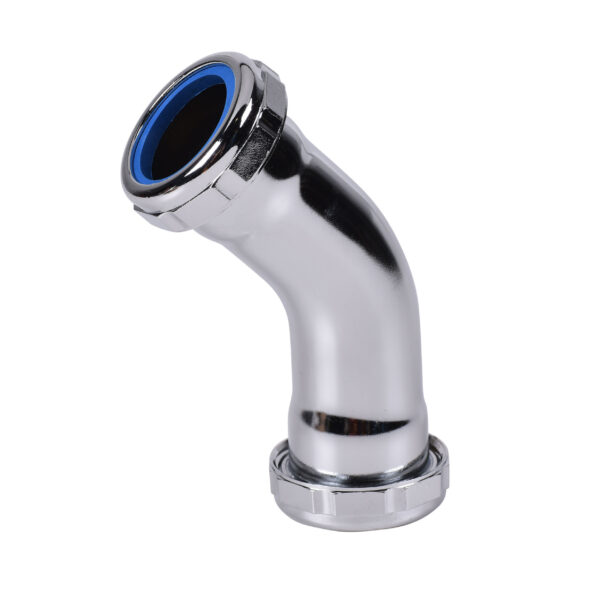
- Wall Tubes: These are pieces of pipe with a curve that fits under the sink and connects the P-Trap to the house’s sanitary system. Wall Tubes are connected to the J-Bend to form the P-Trap and direct wastewater from the sink drain to the waste line without leaks.
- Extension Tubes: These extend the waste pipe to the wall or floor. Extension Tubes come in various lengths and can be cut to size, offering flexibility for accommodating different installation needs.
- Double Slip Joint Offsets: Double Slip Joint Offsets are essential for creating a seamless connection between two pipes at different heights or angles. They come in handy when you need to navigate around obstacles during a plumbing installation.
- Branch Tailpieces: Branch Tailpieces are used to connect a dishwasher discharge hose to the sanitary system, making them ideal for dual-basin or single-bowl kitchen sinks that do not have a garbage disposal.
- End Outlet Continuous Waste: Ideal for dual-basin kitchen sinks.
- Center Outlet Continuous Waste: Used when the drain is centered under a dual-basin sink.
- Direct Connect Waste: Offers a direct connection to the sink basket strainer.
- J-Bends: Helps to form the P-Trap under the sink, connecting to wall tube.
- Captured Nuts and Washers: Made of durable polypropylene, these are used to secure your plumbing fixtures.
Accessories and Other Best Practices: Oatey offers a variety of tubular accessories, including slip joint nuts and washers, flanges, air gaps, and multiple garbage disposal accessories. It is always best to use these accessories with your tubular products to ensure secure connections and prevent leaks.
Further, Oatey recommends using thread tapes or pipe joint compounds on the fine threads of the pop-up tailpiece to prevent leakage. Additionally, considering corrosion resistance and insulating tubular pipes can increase efficiency and durability.
Considering corrosion resistance and insulating tubular pipes is essential for efficiency. Galvanized and stainless steel piping are not commonly used for tubular products, so only use them if your project demands it. Thread tapes and pipe joint compounds may also be used on the fine threads of a pop-up tailpiece to prevent leakage.
Oatey offers covers for ADA sink installations, including center/end outlet waste covers and P-trap covers.
Please note that the specific type of tubular product you will need depends on the requirements of your plumbing project. Be sure to understand these requirements before making a purchase. Always consult local building regulations and professionals as required.
In conclusion, selecting the right tubular for your project as a professional plumber is crucial. Weighing the material options, thickness options, specific applications, and best practices can help you make the right decision for your project.
 About the Author
 About the Author
Sean Comerford is Technical Applications Manager at Oatey Co. He is third-generation tradesman with nearly 20 years of plumbing experience, including serving as the lead plumber for commercial & residential new construction, service and fire protection jobs. He holds a State of Ohio Fire Protection License for Sprinkler and Standpipe.
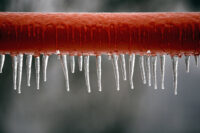
Winterization is crucial for protecting plumbing systems from freezing temperatures and preventing costly pipe bursts and leaks. As a plumbing trade professional, it is essential to understand the steps involved in winterizing both interior and exterior plumbing. This article provides expert winterization tips to share with your customers to ensure their plumbing system remains intact Read more
Winterization is crucial for protecting plumbing systems from freezing temperatures and preventing costly pipe bursts and leaks. As a plumbing trade professional, it is essential to understand the steps involved in winterizing both interior and exterior plumbing.
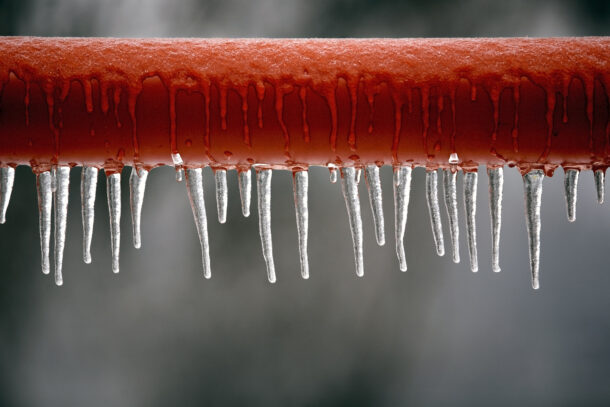
This article provides expert winterization tips to share with your customers to ensure their plumbing system remains intact during winter months.
Steps to Winterize Interior Plumbing
- Shut off the main water valve: Locate the main water valve, usually found in the basement, crawl space, or mechanical room. Shutting off the main water supply and opening all faucets will help drain the system effectively. For multilevel homes, start draining from the lowest level, while for single-level homes, begin from the tap closest to the main shutoff valve.
- Adjust water heater settings: Set the water heater to the lowest temperature or “vacation mode” to prevent the tank from freezing. This step eliminates the need to relight the pilot upon the homeowner’s return.
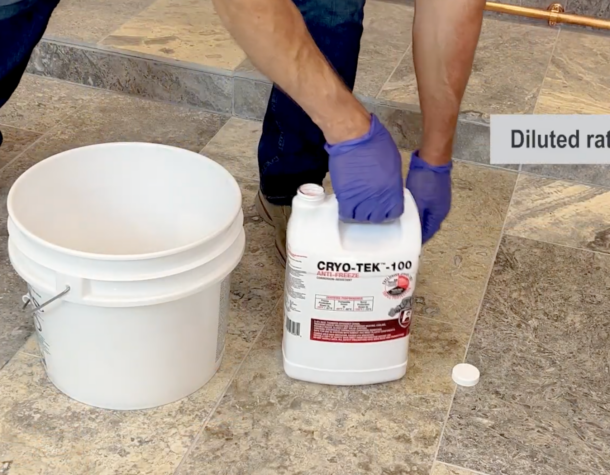
- Flush toilets and add antifreeze: After turning off the water and draining the system, flush all toilets to remove excess water from the tanks. Additionally, recommend pouring an environmentally safe antifreeze into the toilet bowl and tank to lubricate the flapper/seals and prevent dry rotting. Hercules® Cryo-Tek™ 1 gal -100 Antifreeze is a ready to use 55% Virgin Propylene Glycol formula designed for hydronic heating and cooling closed loop systems and general plumbing systems that require freeze protection. Any Hercules Cryo-Tek product can be added to protect pipes from freezing and bursting. It also prevents freeze-ups in chiller systems, recreational vehicles, seasonal homes, mobile homes, trailers, boats, and industrial use.
- Prepare drains with antifreeze: Pour antifreeze into shower, tub, floor, and sink drains to prevent freezing and maintain trap seals. This step ensures that water in the traps does not freeze or evaporate.
- Maintain heat and air circulation: Keep the thermostat set to at least 55°F to prevent pipe freeze damage. Additionally, encourage clients to have their heating system inspected and serviced for optimal performance. Recommend keeping cabinet doors beneath bathroom and kitchen sinks open to allow warm air to reach the pipes.
- Insulate exposed piping: Protect pipes in uninsulated areas and along exterior walls by covering them with insulating sleeves or wrap. This safeguards the plumbing system against frigid temperatures.
- Seal off the garage: Advise homeowners to keep their garage doors shut to prevent cold drafts from reaching the plumbing on adjacent walls. Suggest adding a vinyl or rubber strip to the bottom of the garage door for better insulation against cold air and potential mold prevention.
 Flush toilets and add antifreeze: After turning off the water and draining the system, flush all toilets to remove excess water from the tanks. Additionally, recommend pouring an environmentally safe
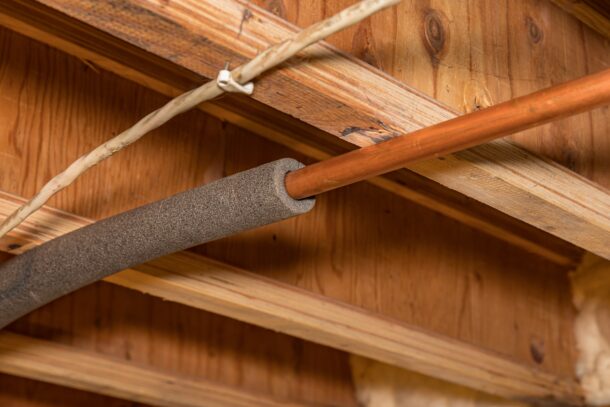
Steps to Winterize Exterior Plumbing
- Turn off external water supply valves: Locate the isolation valves on the water lines leading to the external water supply (usually in the basement, crawl space, or mechanical room) and shut them off. Open all taps until water is completely drained from the outside hose bibbs.
- Disconnect garden hoses: Recommend clients remove garden hoses and fittings from the hose bibbs to prevent freezing. Water expands when it freezes and can cause pipe damage. To prevent valve damage, we suggest using an air compressor to blow out any residual water in the exterior lines.
- Clear gutters and downspouts: Advise homeowners to clean out their gutters and downspouts to ensure proper water flow and prevent ice build-up, which can lead to costly repairs.
- Seal cracks and gaps: Check for any visible cracks or gaps in siding, door frames, or windows. Use a sealant to fill both exterior and interior cracks, effectively blocking drafts that can lead to frozen pipes and increased utility bills.
Preventing frozen pipes during the winter requires thorough winterization both inside and outside the property. Following the steps outlined in this guide will help protect your clients’ plumbing systems and save them from potential headaches and expensive repairs.
About the Author
Sean Comerford is Technical Applications Manager at Oatey Co. He is third-generation tradesman with nearly 20 years of plumbing experience, including serving as the lead plumber for commercial/residential new construction, service and fire protection jobs. He holds a State of Ohio Fire Protection License for Sprinkler and Standpipe.
Without proper maintenance, steam and hot-water boilers in hydronic heating systems corrode and become less efficient, leading to additional service calls and a shorter life span. Replacing a heating system can be very expensive, costing home and building owners thousands of dollars. To help prevent this, encourage your customers to spend a little money every Read more
Without proper maintenance, steam and hot-water boilers in hydronic heating systems corrode and become less efficient, leading to additional service calls and a shorter life span. Replacing a heating system can be very expensive, costing home and building owners thousands of dollars.
To help prevent this, encourage your customers to spend a little money every year on services to maximize the life of their heating systems and prolong a significant expenditure.
With that said, there are some best practices when it comes to servicing a boiler not firing up or flushing different types of hydronic heating systems. In such a system, water expands when it is heated and contracts when it is cooled; i.e., enlarges or reduces in volume. Known as thermal expansion, this is the tendency of matter to change its shape, area, volume, and density in response to a change in temperature.
To accommodate thermal expansion, storage is needed within a system. Two types of systems accommodate thermal expansion: a closed loop (sealed) system and an open loop (vented) system.
Before we dive into how and when to flush a heating system, let’s take a closer look at the difference between a closed loop system and an open loop system.
What is a Closed Loop System versus an Open Loop System?
Closed Loop
In short, a closed loop system is closed to the atmosphere. These systems integrate expansion tanks to accommodate the expansion and contraction of water. A closed system also has a built-in, dedicated return line to carry water back to the heating source (usually a boiler), preventing the possibility of warm or cold spots from mixing in the water supply, as happens in an open loop system.
Usually smaller than open loop systems, closed loop systems there take up less space, while assisting with cleanliness, improving water quality, and reducing the entry of oxygen into the system.
As already noted, a closed loop means less potential for water to enter the system, and that decreases the risk of corrosion.
Open Loop
An open loop system is open to the atmosphere and draws water directly from the hot or cold water lines to which it is connected. Open loop systems have an open expansion tank that accommodates expansion and contraction within the system. More evaporation happens with this type of system, leading to more water being introduced and possibly contaminating the system.
While closed loop systems aren’t as common, they are usually older heating systems and often cannot reach higher pressures. As mentioned, these units allow pollutants to enter the system water, so feed and expansion tanks require periodic cleaning. That enables oxygen to enter the system, contributing to corrosion.
The pipework run from the expansion tank location to the mechanical room where the boiler is located can be grueling and will need insulating to protect against freezing. (More on freezing temperatures later.)
When to Flush a System
Flushing A Hot Water System
Newer residential hydronic systems with hot-water boilers are closed-loop. We do not recommend opening and flushing a closed loop system unless you absolutely have to. Why? Because the enemy of such a system is actually oxygenated water.
However, like a car, closed loop hydronic heating systems must be regularly serviced to prevent problems and maintain efficiency. But unlike a car, they don’t cough, stutter, give off smoke or produce a foul odor when something goes wrong. The system just silently continues doing its job, slowly deteriorating in performance and failing much sooner than it should.
However, sometimes the system will provide some clues that it is acting up — like making a rumbling noise as minerals start to collect in the system. After all, a closed system still has a component that feeds water into it if it needs to.
Additionally, your customer might have a system leak that they weren’t aware of, adding oxygenated water to the system for years. That will cause many problems and change the pH level in the system.
For a closed-loop residential boiler to operate properly, the liquid it circulates must maintain the correct pH levels. To truly identify if you have a potential leak or sludge buildup, you must conduct a pH test to determine if the system should be flushed with a cleaner. We recommend conducting a pH test at least once a year.
Start with a visual reading by opening the drain valve and bleeding off some liquid. If it appears clear, proceed with a pH test. To run a pH test, you can buy test strips that provide a color-coded readout. If you need a more precise reading — say, for an aluminum system — use a digital pH meter.
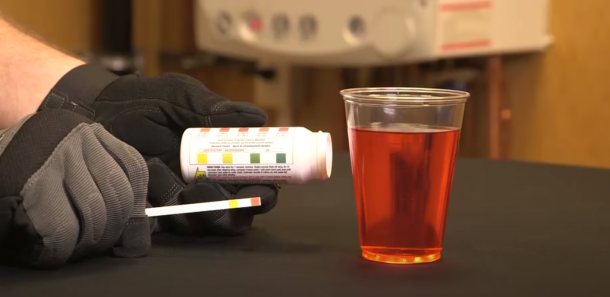
The correct pH level depends on the composition of the heat exchanger. Systems with a cast iron, stainless steel, or copper exchanger are resilient and usually have a wide range of acceptable levels. Aluminum is more prone to corrosion and may require a specific pH number. Read the system’s installation and operating manual to determine the acceptable pH range. We recommend using a corrosion inhibitor to balance out the pH — a seamless fix. However, if the buildup or corrosion has been going on for several years, the system will probably not recover with this treatment. Instead, you’ll have to use a cleaner to flush the system to maximize boiler efficiency.
Check out this blog that covers the impact of pH in hydronic heating systems and how to test and balance levels.
Flushing A Steam Heating System
Larger steam boilers are usually used in multifamily or commercial applications. Years ago, these large steam boilers held thousands of gallons of water. But, as time went by, steam boilers became more efficient. Today, more compact units are available.
As a steam boiler heats up, water turns into steam and eventually flows through the system. When that steam condensates, it all returns to the boiler. But newer, more compact boilers don’t have nearly the capacity of their older, larger counterparts, so the former run out of water quickly.
Over the years, the industry has developed components to sense when the boiler is low on or out of water. They will shut the boiler down, giving the system time to fill up. So these safety components essentially prevent the unit from firing if it’s low on or out of water.
Some components are electronic. Others involve a ball sitting inside the unit that floats up and down as the water level of the boiler changes.
Timers on these systems will indicate a shutoff for, say, one to three minutes, providing time for all the condensate and water to return to the boiler. Then, if the return water is not sufficient, electronic and solenoid valves will open to let more water in.
That, of course, permits corrosion-causing, oxygenated water into the system. Which is why these safety components must be flushed from time to time, because of the likelihood of mineral buildup.
Which is why steam boilers require regular maintenance and should be flushed with a cleaner or corrosion inhibitor at least twice a year — typically at the beginning and at the end of the heating season.
Preventative Maintenance and How to Flush a Heating System
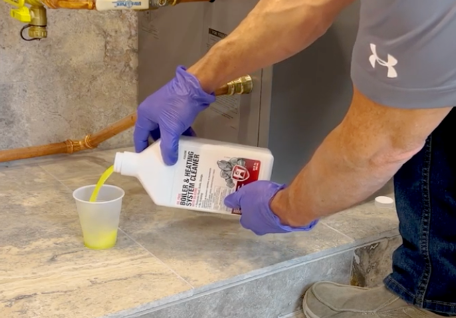
Depending on how dirty the system is and if you don’t want to take it out of operation to completely flush it, we recommend using a cleaner like Hercules® Boiler and Heating System Cleaner. That’s because it can stay in the system and doesn’t require flushing the system.
Hercules Boiler and Heating System Cleaner is formulated to clean and condition all steam and hot-water boilers in hydronic heating systems. The cleaner contains silicone to protect pumps by lubricating seals, maximizing efficiency and preventing valve clogging and corrosion.
Still, be sure to check the pH levels in the system. If the first liquid sample in your visual pH reading contains a lot of rust or sludge, you must take a more aggressive approach by flushing the system with a system restorer. Sludge indicates corrosion in the heat exchanger, fittings or piping.
Here’s how to remove sludge:
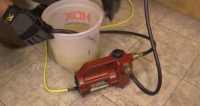
- Drain off about a gallon of liquid and replace it with three quarts of water and one quart of a system restorer like Hercules® Sludgehammer™ System Restorer & Noise Reducer, which removes scaling and sludge deposits.
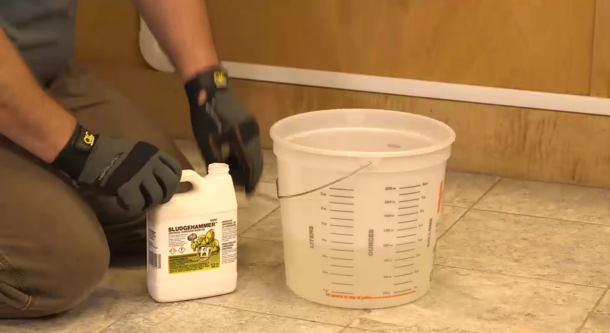
- Let the solution circulate for two hours.
- After 2 hours of cycling, dump the system. Leaving the chemical in for too long can damage metal pipes and fittings and ruin the heat exchanger.
- Refill the system with a blend of water and inhibited virgin propylene glycol to prevent corrosion and scale buildup inside the heat exchanger and piping system. Always reference the system manufacturer’s installation and operating manual to ensure you use the proper blend.

Watch this video to learn how to remove sludge and corrosion in hydronic heating systems with Sludgehammer.
While Flushing the System, add Antifreeze
Many contractors use only water in indoor hydronic heating systems. However, water freezes at 32° Fahrenheit; so if there is a power outage, pipes could freeze and burst. In addition, as we’ve learned, water also promotes corrosion and mineral buildup.
Adding an inhibited virgin propylene glycol antifreeze to a boiler corrects both of those problems. Installing inhibited virgin propylene glycol into hydronic heating systems is also a requirement to maintain warranty by leading boiler manufacturers.
The type of antifreeze you’ll need depends on the climate and the metal content of the system.
- For cast iron, stainless steel, or copper systems, choose an antifreeze solution like Hercules® CryoTek™ AG, -100, Original or Universal.
- For systems with aluminum heat exchangers, the best choice is an antifreeze that works with any type of metal, such as Hercules® Cryo-Tek™
- Depending on the level of freeze protection required to have an effective and efficient operating system, you can choose blends like Cryo-Tek™ AG or Universal and blend them with distilled water to arrive at the proper freeze protection. Or you can purchase pre-blended formulas like -100 or Original.
The active ingredient of antifreeze is propylene glycol. Avoid antifreeze products that contain “used” propylene glycol, which may introduce minerals and other foreign particles to the boiler. Look for a label that reads “inhibited virgin propylene glycol.”
 Author’s biography: Sean Comerford is a Technical Applications Manager at Oatey Co. He is a third-generation tradesman with nearly 20 years of plumbing experience, including serving as the lead plumber for commercial/residential new-construction, service and fire protection jobs. He holds a State of Ohio Fire Protection License for Sprinkler and Standpipe.
There’s a strong chance you’ve installed or spotted copper pipe somewhere in a home or building. Copper is the metal of choice for potable water systems for a variety of reasons – the most important being that it is non-toxic and safe for drinking. The naturally occurring metal element is also preferred for various application Read more
There’s a strong chance you’ve installed or spotted copper pipe somewhere in a home or building. Copper is the metal of choice for potable water systems for a variety of reasons – the most important being that it is non-toxic and safe for drinking. The naturally occurring metal element is also preferred for various application types due to its high conductivity of electricity and heat, corrosion/fire resistance and durability.
The process of joining copper pipe and fitting is called soldering (or sweating), which is a critical step in the copper installation process. Solder is a metal or metallic alloy that historically consisted of lead (known as lead-based solder) and tin in various proportions. Today, due to the Safe Water Drinking Act and lead-free restrictions, solders that contain more than 0.2% lead are not permitted for use in potable water systems.
Solders that are safe to use on potable water systems contain a percentage of tin and a combination of other non-toxic metals. The melting point of solder is lower than copper, and when heated, solder melts and fuses the piping together once completely cooled.
Learning how to solder copper pipe can seem daunting at first, but by applying proper techniques and avoiding typical errors, it becomes much easier to execute a leak-free pipe joint.
Let’s explore five common mistakes to avoid during the soldering process.
Choosing the Wrong Products
In addition to choosing the proper type of solder for your application, you will need to select the right type of copper pipe and flux, a compound that promotes the flow of molten solder between the pipe and fitting through a process known as capillary action.
Flux is also formulated to remove any oxidation from pipe and actually etches pipe surface in preparation for the soldering process to be successful. Important variables, such as ambient temperature, local code guidelines, and any jobsite time limitations, should all be considered prior to purchasing your soldering supplies.
Below, we’ve included some brief guidelines to keep in mind for your next soldering project.
- Copper Pipe
- Type K: Has the thickest wall and strongest durability. It is commonly used for commercial plumbing, such as underground water mains for potable water supply and HVAC lines.
- Type L: Wall thickness falls between Type K and M. Typically used for interior hot and cold-water distribution.
- Type M: Has the thinnest wall and is the most popular choice for domestic plumbing systems due to its light weight, decreased rigidity and affordability.
- Copper DWV: Commonly used in older homes for vents and drains. No longer a popular choice among modern-day homeowners, as there are more cost-effective options available.
- Flux
- Petroleum-based Flux (or Petrolatum Flux): Flushing required and designed to provide superior wetting properties for better solder flow. Compatible with all common plumbing solder alloys, such as copper, copper-coated metals, brass, zinc, galvanized iron, lead and tin.
- Hot Weather Flux: Specially formulated for hot weather climates and will not separate in temperatures up to 135°F.
- Water-soluble Flux: Water flushable and compatible with all common plumbing solder alloys.
- Tinning Flux: Available in both water-soluble and petroleum-based formulas. Enhanced with tinning powder particles to pre-tin piping and improve the flow of solder/enable even heating of a fitting, which is necessary when soldering larger diameter piping systems. Compatible with all common plumbing solder alloys. Check out this article to learn how to expertly solder low-lead brass using tinning flux.
Although petroleum-based fluxes are safe to use, they are required to be flushed with a chemical solution from the piping system due to their water insolubility. However, water-soluble fluxes become self-cleaning and flush away once water enters the system. Refer to manufacturer instructions for product-specific application and safety guidelines to ensure proper use.
- Solder
- Tin-antimony Solder: Contains 95% and 5% antimony. Lead-free and safe for water supply lines. Designed for use in plumbing applications where frequent extreme temperature changes and vibrations occur (refrigeration, cooling equipment and heat ducts); can also be used to solder electronics. Melting range is 450°F to 464°F. Has an unlimited shelf life.
- Copper-tin Solder: Contains 97% tin and 3% copper. Lead-free and safe for water supply lines. Designed for sweating copper and brass plumbing joints. Melting range is 440°F to 572°F. Has an unlimited shelf life.
- Silver-bearing solder: Contains silver, copper, bismuth and tin. Lead-free and safe for water supply lines. Ideal for low-lead brass applications. Has a wide melting range (420°F to 460°F) that enables more time for soldering joints.
Skipping the Prep
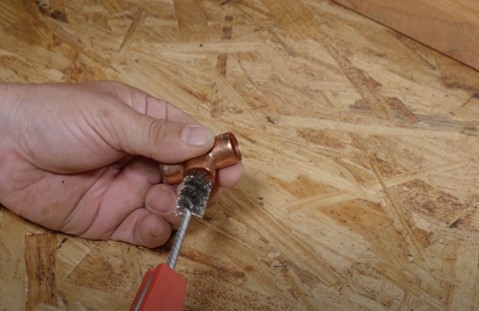
Failure to properly prep both the pipe and fitting is arguably one of the most critical mistakes in the soldering process. To achieve a properly sealed joint, oxidation and oils on the copper surfaces must be removed using special cleaning tools. Otherwise, it’s likely the solder will not completely fill the cup of the fitting, resulting in a weak or leaky joint.
Each of the following steps should be completed as you prep copper pipe for the perfect joint:
- After cutting the copper to the desired length, deburr (or ream) the inside of pipe end using a deburring tool to remove any small bumps or roughness (known as burrs) on the inside diameter or the pipe. If this step is overlooked, pipe pressure will decrease and water flow will be restricted. Any leftover burrs or copper shavings could cause noisy pipes when water enters the system.
- Remove oils and dirt from the outside of pipe end and polish clean with an abrasive sand cloth, open mesh cloth, nylon grit pad or tube cleaning brush. For wet applications, a nylon grit pad or open-mesh cloth are ideal due to their self-cleaning abilities.
- Clean all openings of the fitting hub with a fitting brush.
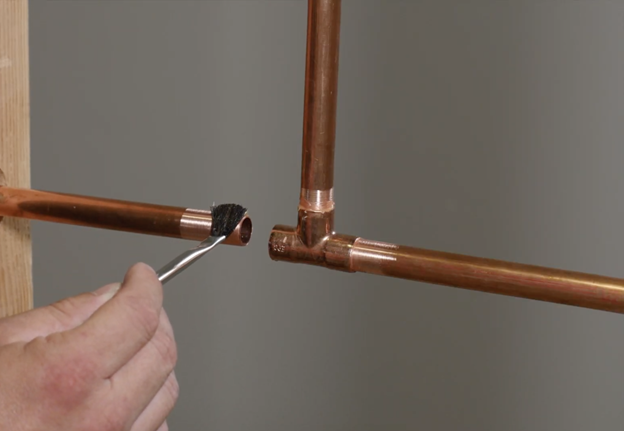
Applying Too Much Flux
 Applying Too Much Flux
It can be tempting to use a large glob of flux while soldering. However, we recommend evenly applying a thin layer of this product with an acid brush to copper pipe and the inside of a fitting – any excess flux should be removed prior to connecting them.
Applying too much flux will not only result in uselessly wasted product, but could also cause severe pipe damage over time. Once heat is applied to flux it turns to an acid; however, any excess flux will melt and travel through the inside of pipe, which may result in pitting and corrosion.
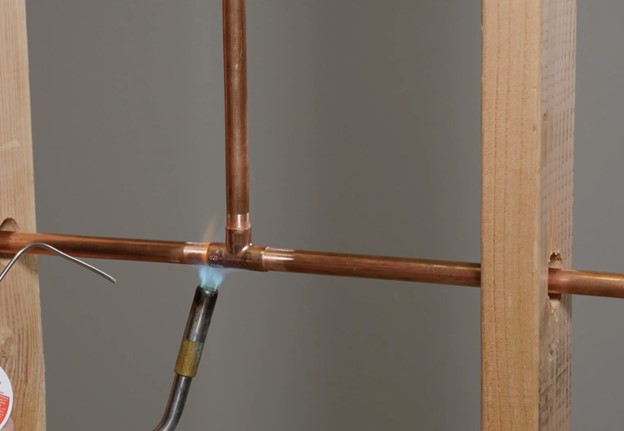
Overheating the Joint
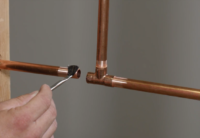
When heating the fitting to sweat the copper pipe, make sure you remove the flame as soon the solder melts. As solder melts, flux will pull the solder into the fitting cup. Too much heat will cause excess solder flow or flux to burn out, which will increase the chance of a leak path.
Pro Tip: Never heat solder directly because you risk melting and breaking it off completely. It’s best to heat the joint evenly and then position the tip of the flame to the bottom of the fitting hub. The solder will flow toward the heat source and ensure the joint is completely filled.
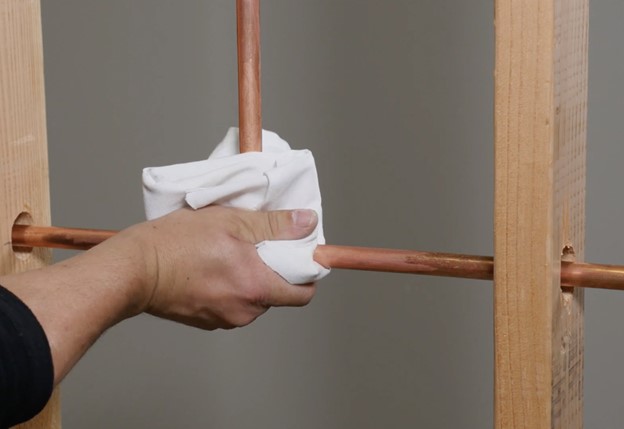
Neglecting Clean Up
While the joint is still warm, immediately wipe away any leftover flux or solder drips with a dry rag to ensure copper pipe longevity. Excess flux may seem harmless; however, it can cause Verdigris, a greenish-blue discoloration commonly found on copper, bronze and brass, to form and destroy copper pipe over time. An old, rusting penny and the Statue of Liberty are great examples of Verdigris in action.
READY FOR YOUR NEXT SOLDERING PROJECT?
For a step-by-step guide on how to solder copper pipe, check out the video below.
Author’s biography: Sean Comerford is a Technical Customer Service Specialist at Oatey Co. He is a third-generation tradesman with nearly 20 years of plumbing experience, including serving as the lead plumber for commercial/residential new construction, service and fire protection jobs. He holds a State of Ohio Fire Protection License for Sprinkler and Standpipe.